Russian Tie Throw – A Gi Variation For Brazilian Jiu-Jitsu

Russian tie throw with the Gi

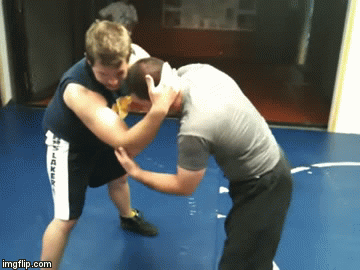
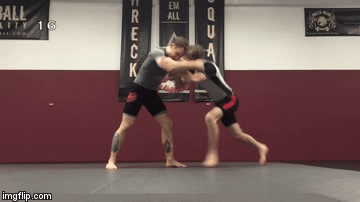
The subject of takedowns has been beaten to death, yet still, a lot of innovation emerges in that area of BJJ. As the art evolves we’re living witnesses to a huge and important shift in focus. From its inception, BJJ focused on “borrowing” takedown and throw techniques from other martial arts. As the art evolves, though, it seems like it’s slowly finding its own legs to stand on. Today, BJJ is done borrowing and is instead, looking to modify straightforward wrestling or Judo takedowns. These techniques are somewhat limited because they’re meant for Judo or Wrestling. And, since BJJ is known as the art where experimentation is encouraged, it’s not surprising that you’re seeing Judo staples modified to No-Gi grappling or vice versa. The Russian Tie Throw is one such example.

The distinct lack of original BJJ takedowns is somewhat of a conundrum. As a grappling martial art, Jiu-Jitsu thrives on the bottom. However, getting the match or fight there, seems to be second in importance to what happens on the ground. Which is somewhat confusing, to say the least. Luckily, the latest direction is one of innovation and combination, rather than imitating other arts. Today, we’re going to be exploring a very reliable wrestling technique and how to modify it to Gi BJJ. it is the Russian tie throw, which most people perceive as a distinctly wrestling/No-Gi move. Today, we’ll try to change that and demonstrate just how far BJJ can evolve.

While modifications are absolutely necessary, they do not mean the original move needs to be discarded. As Hudson Taylor demonstrates in his “Wrestling For BJJ” DVD set, Jiu-Jиtsu has a lot to more to learn and integrate from Wrestling. Check it out to improve your takedown and top position game quickly and massively!

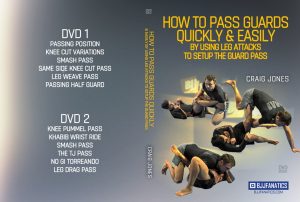
The Wrestling Russian Tie Throw

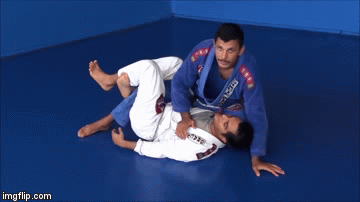
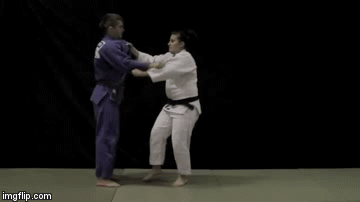
The Russian tie throw is a very powerful technique that works just as good in BJJ as it does in wrestling. It is just one option from the Russian tie position that we covered in depth in another article. The Russian tie is a very versatile position that can lead to cradles, front headlocks, single leg takedowns, ankle picks and more. On top of it all, there’s also the Russian tie throw that’s as impressive as it is effective.

Wrestling Russian Tie Throw 
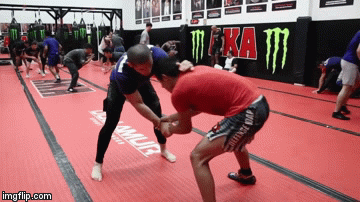
For the basic Russian tie position, you want to be to the side of your opponent, similar to where an arm drag takes you. The difference here is that you do not want to go to your opponent’s back, but rather control the outside of their arm, shoulder to wrist. For control, one arm grips the wrist, while the other underhooks the arm around the triceps. This offers both immense control and the ability to take someone down at will.

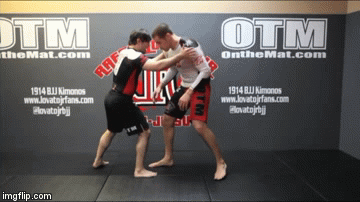
For a direct Russian tie throw, all you need to do is look to roll under your opponent, aiming to get your head in between his legs. This is going to take your opponent over your body and down to the other side. When done fast and explosive, this is a truly unstoppable takedown. The fact that it works just a well on a bent opponent and on one attempting to regain posture, it is the perfect fit for BJJ. And now you can do it with Gi grips as well.

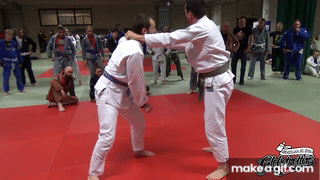
The BJJ Russian Tie Throw With The Gi

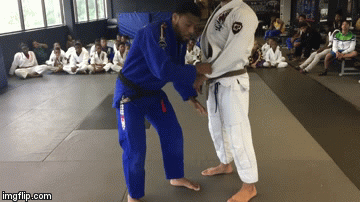
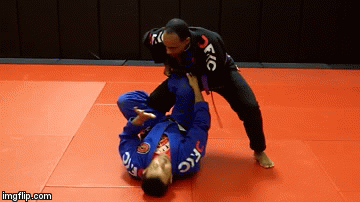
The first thing to understand about the modified Russian tie throw for BJJ is that the dynamics of the setup are significantly different. This is due to the fact that the Gi grips make the positioning a lot different than in wrestling or No-Gi. Her, you’ll be standing in front of your opponent while you’re setting the throw up. Let’s take it to step by step.

Step 1: Establishing Grips

Russian tie throw grips Gi
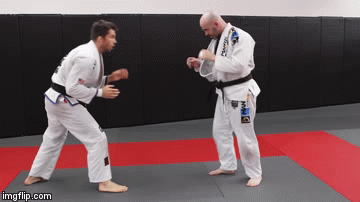
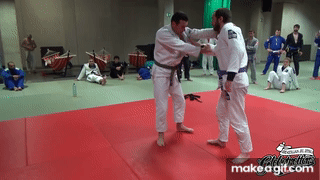
First, and foremost, let’s tackle the grips. The first order of business is to make sure your opponent has no grips on you. So, if they establish a collar grip, break it, preferably using both your hands. next, establish a cross grip on the opponent’s sleeve. This means your right hand is going to grip the Gi near the wrist of their right hand. Your left hand, in this instance, goes over the shoulder and grabs the back of the Gi collar. The grip here is a thumb in grip, with four fingers on the outside of the collar.

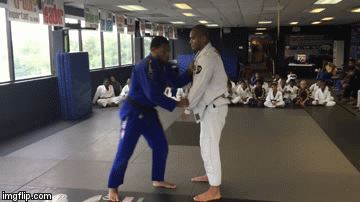
Step 2: Kuzushi And Movement

Since you’re now standing in front of your opponent, you’ll want to change your approach, or you’ll just roll under giving away side control. The thing to add here is one of the key Judo principles – Kuzushi. translated from Japanese, this means off balancing. To get your opponent out of balance, you’ll have to threaten their posture and base at the same time.

Russian Tie throw When you’re standing, the best way to do this is to use your grips to attack the posture and look for footsweeps to make your opponent move in a certain direction. First, you’ll push them backward, doing a few forward steps your self. Then, stop abruptly and start going backward, forcing your opponent to follow. After a couple of back steps, look to sweep their lead foot with an outer sweep or Deashi Harai. If you time it right, you’ll get a sweep right there to get the fight to the ground. If that fails, you have the Russian tie throw ready to go.
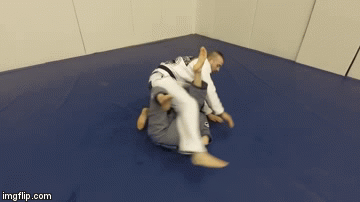
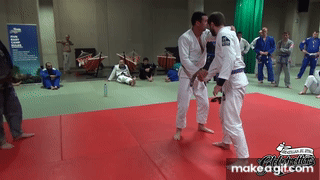
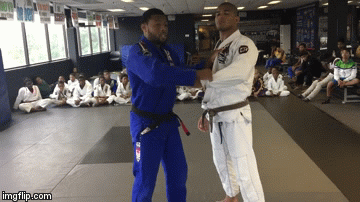
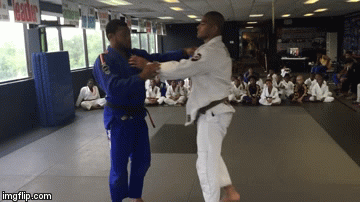
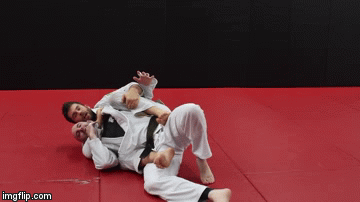
Step 3: The Roll 

What an experienced opponent is going to do is retract the leg you’re attacking with the foot sweep. This is actually what you want. Now, you have the opponent standing in an Orthodox stance, the same as you. This opens up space you need to execute the Russian tie throw.

Russian Tie throw 
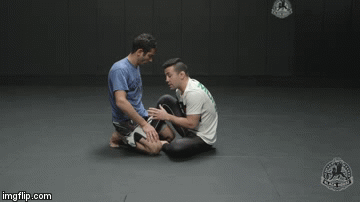
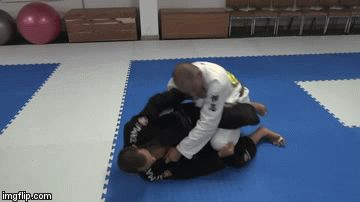
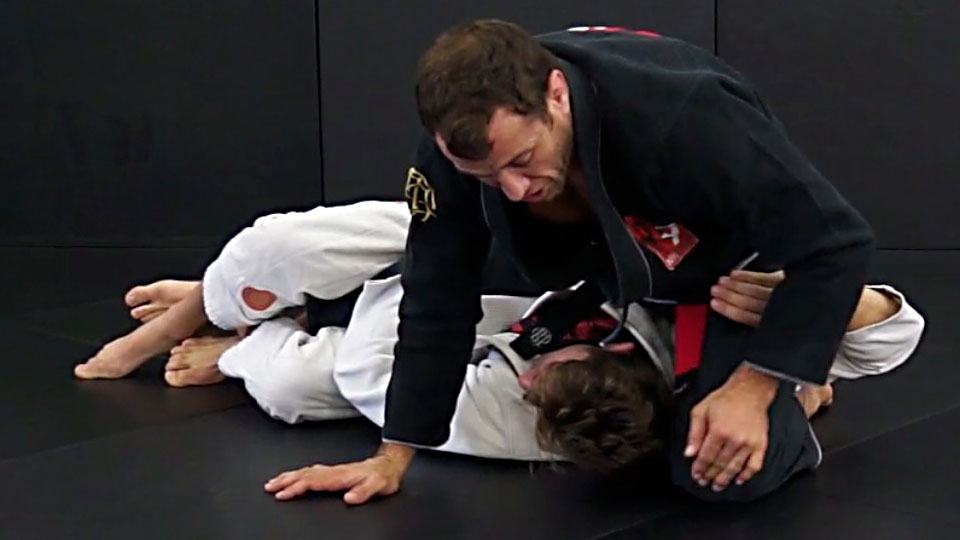
Positioning yourself correctly for the roll is the crucial step. If you miss that, you’ll end up on the bottom, most likely in north-south. Your main goal is to first kneel with your back leg. The next and most crucial thing is placing your head right in front of the foot of your opponent’s front leg. Any other spot is not going to result in a successful throw.

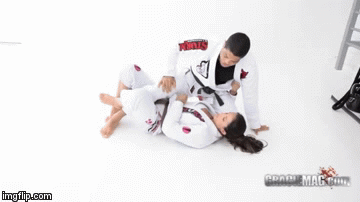
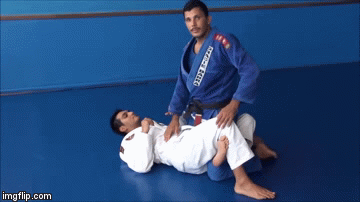
As you get your head in position, remember your grips. Tuck the elbow of the arm that grips the opponent’s sleeve very close to your torso. Use the collar grip to pull once your head touches the ground in front of the opponent’s foot. From there, simply extend your legs and roll like a log across your back, taking the opponent over you. You end up in a great position to take the back or hit an armbar. Just remember to keep a hold of both grips until the very end.

Video Source 1

Video Source 2

A Complete Instructional For The Trainwreck BJJ Throw

Trainwreck BJJ Throw Instructional

Back when I was a white belt, I witnessed something at a competition that made me really value modified Judo throws for BJJ. A blue belt teammate of mine went up against a seemingly unassuming competitor. The moment this kid got his hands on my teammate, he went flying up and down, like he was being manhandled by the Hulk himself. The BJJ throw that inevitably followed had my friend crash landing on his head. Needless to say, the match didn’t go his way. The moment I saw that BJJ throw, I knew I had to have it in my arsenal. So I researched it and found very little. Actually, there’s not much info on it to this day, but experience and learning form lot of great Judokas has had an impact. Today, we’ll be talking about the unstoppable trainwreck BJJ throw.

The kid that my teammate faced that day was no other than a blue belt River Dillon. Little that we know that the Trainwreck is his signature move, one that has claimed a lot of matches since. The Trainwreck is actually a modified Judo throw that some of the very best BJJ competitors like to use. Examples include Rodolfo Vieira, Alain Pozo, and Tim Spriggs. it is this last one, though, Tim Spriggs that took the Trainwreck BJJ throw to a whole different level.

Looking to become a takedown machine? Look no further than “The Takedown Blueprint” DVD set. it features Judo legend Jimmy Pedro along with BJJ and Judo black belt and Olympian Travis Stevens. Exactly the pair you want teaching you how to send people flying!

The Trainwreck BJJ Throw

The Trainwreck BJJ throw is actually nothing new. It is just a very cool variation on an old Judo classic, that fits the needs of Jiu-Jitsu more than those of Judo. Today, people that really know how to hit this move are reaping the benefits of it at all competition stages across the world.

Trainwreck BJJ ThrowThe origins of this throw lie in the Eri Seoi Nage Judo throw. The Eri Seoi Nage is done by controlling an opponents sleeve and collar on the same side. For it, you’re using a cross collar grip and a same side sleeve grip. The goal is to place the elbow of the collar grip arm under the opponent’s armpit as you enter into a throwing position. The other arm stays high, guiding the opponent over your hip as you get into position. From there, you finish like any other hip throw.

The Trainwreck BJJ throw has the same starting position. Actually, the grips are identical to the Eri Seoi Nage. The execution, however, is where the Trainwreck shines. Instead of taking the opponent over your hip, thus exposing the back, the Trainwreck offers a different route. it actually takes the opponent sideways and slams them to the ground much more effectively.

Trainwreck BJJ ThrowTim Spriggs is one of the best, if not the absolute best, at using the trainwreck BJJ throw in competition. He sends people flailing around before they come crashing down to the mats, unaware of where they are. The best thing about this takedown is that it’s fairly easy to learn and can work for everyone.

Upper Body Positioning

The key components, as with any other takedown, are the grips. The goal is to get to the preferred grip position first and keep your opponent from getting in grips of their own. If they do, you’ll need to focus on breaking them before you proceed with the throw. The cross collar grip needs to go in with four fingers in, at the level of the collarbone. For extra pain, make sure your knuckles are right up against the collarbone. The sleeve grip goes with four fingers in a pocket, a low as possible towards the wrist.

Trainwreck BJJ Throw GripsThe Trainwreck BJJ throw has two distinct motions with the arms that can make or break the move. The collar gripping arm is the more complicated of the two. You actually need the lapel to finish this throw and this arm is crucial. You want to take your grip towards the shoulder in a circular fashion. First you go up then you go towards the shoulder, and finally, you take the grip down. This is going to both break the opponent’s posture and initialize the throw.

The other arm’s positioning is fairly simpler. It needs to push the sleeve of the other arm towards the opponent’s belt. However, you need to make sure that you do not take the arm and pull it across the opponent’s body towards the other side. This will negate your first arm motion. Instead, simply place the palm of their hand firmly on their own belt.

Lower Body Positioning

As with the upper body, the lower body positioning also plays a huge role line the effectiveness of the Trainwreck BJJ throw. In fact, the legs are the power source behind the throw. The drive behind this throw is in the leg positioning and how you collapse your legs, rather than how you push with them.

Trainwreck BJJ Throw Leg Position Let’s go over everything in detail. The leg that is further from the opponent is going to stay with the foot on the mat at all times. All you need to do is bend this leg, with the knee pointing outwards. The direction of the knee needs to be the same as the direction of the throw itself.

The other leg is the crucial leg in this throw. It is the leg that is closer to your opponent. As you do both arm motions at the same time, this leg needs to go down on its knee, again, pointing outward. The two arm motions and this leg motion need to be as close to each other as possible in order to get an effective throw.

Finishing Details 

In setting up the move, it is important to understand that you can’t the trainwreck BJJ throw from a static standing position. You’ll need to rattle your opponent first and get them into position for the throw. The best way to do this is to employ a pull-push-pull movement in a repetitive manner. In order to make it clear, it is like snapping a towel up and down. This is going to completely take away the opponent’s posture and make them focus on regaining it.

Trainwreck BJJ Throw ArmbarAt this exact moment, you’ll threaten the opponent with a foot sweep. This further offsets their balance and compromises their position. The foot sweep of choice here is a Ko Uchi Gari. In order to be effective, you really have to go for it. In some cases, you’ll even get it which means you get an even easier takedown. However, when your opponent defends it by taking their leg back, you’re all set for the Trainwreck. As they place their foot down, go for the arm motions, followed immediately by the front leg’s knee drop.

Trainwreck BJJ Throw 
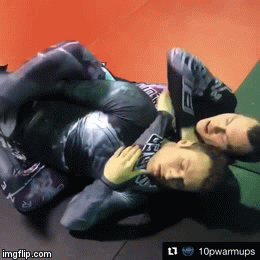
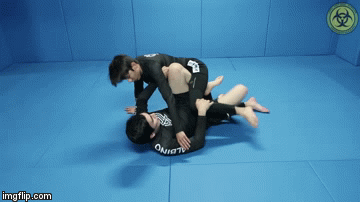
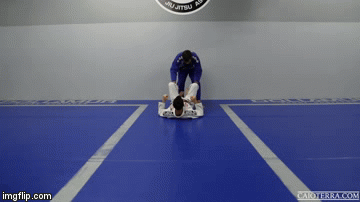
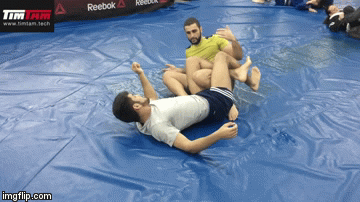
The position that the opponent ends up in is a really great one for you. Keeping the grips is imperative as you now end up with the option to hit an armbar straight away. Getting the submission is not going to be hard at all, given that your opponent is still going to be confused from the throw.

1 Video

2 Video

3 Video 

Sneaky Alternative BJJ Back Attacks For Stubborn Opponents

Alternative BJJ Back Attacks

The back position is considered to be the one position that is superior to all others in the sport. While today, many people might disagree, what everyone must confess it that BJJ back attacks are amongst the most reliable attacks in all of grappling martial arts. To that extent, lots of people dedicate enormous attention and time to training BJJ back attacks. However, this doesn’t even come close to the time people that try to counter and defend them put in. which means, this staple of BJJ and the position that brings joint-most points, is now one of the very few successful attacks. Well, there’s a way out, or better said, around this. 

The most frustrating thing when you’re attacking the back is when you can’t sink in that choke. regardless if you’re going for a bow and arrow or a rear naked, having back control and not submitting someone is like eating a vegan burger. It’s good, but not quite like the real thing. In most cases, It’s even difficult for people to move from the back into other attacking positions, like towards a Kimura or an armbar, or even an arm triangle. This is actually the great dilemma of the back mount. Should you keep it at all cost, or move towards an “inferior” position in order to get a tap?

Johnd Danaher back Attacks Enter The systemIn terms of regular back attacks, John Danaher has all the answers. The BJJ guru even covers some unorthodox concepts in terms of attacking from back mount. Check out his second release “Enter The System: Back Attacks” to learn the most comprehensive system for finishing from the back that grapplers have ever known! And, for a few very unusual attacks to add to it, keep reading this article.

Common BJJ Back Attacks

The common things you can do from the back are not many. At least not many that work. Most people think about retaining the back more than they think about submitting, So, abandoning submission attempts in order to keep both hooks in or a seatbelt grip in place is not uncommon. Sacrificing a hook is no big deal if the result is putting your opponent to sleep.

The clear options from the back are, of course, strangles. You can either go for the classic rear naked choke, hit a short choke or look to strangle with the lapel. All of these are the first choice option for a reason – they have a very high success rate. So, when you’re going fro BJJ back attacks, focus on these first.

One thing you can do is a transition into armlock attacks on the weak side. In back control, it is the side on which you have the arm under their armpit. It is quite easy to go get their head out of the seatbelt and you’ll be left with a Kimura grip. Placing your far side leg across their head gets you in a great armbar position. While not a point position, it offers a lot of attacks besides the armbar, like Kimuras or Omoplatas.

From a different perspective, you might choose to go the choking route. For a back triangle, all you need is getting the leg from the “over” arm side across the neck. Or, if you prefer choking with your arms, just circle the “under” arm across the neck until you reach an arm triangle position. Of course, in both instances, you’ll have to abandon back control in order to continue with BJJ back attacks.

Alternative BJJ Back Attacks

So, what are soma alternative avenues to explore in terms of BJJ back attacks? Could you perhaps enforce a choke, despite your opponent holding your hand firmly inside your seatbelt grip? Could you perhaps, somehow, find a way to hit a leg lock directly from there? How about neck cranks, or weird unexpected armlocks? Well, this is BJJ, so the opportunities certainly exist. All you need to do is be aware and recognize them when they present themselves.

The Sneaky Kamikaze

This is without a doubt, my one favorite move that stems from unsuccessful “regular” BJJ back attacks. If we imagine that you can’t find a way past your opponent’s defenses, yet you still do not want to give the position up, you might go for this one. It is one of Eddie Bravo’s inventions and a really cool one at that. What you want to do is fall to the choking side first.

BJJ Back Attacks Calf Slicer
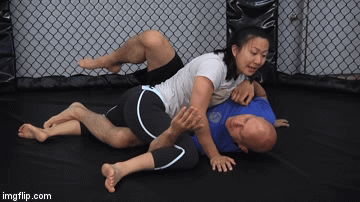
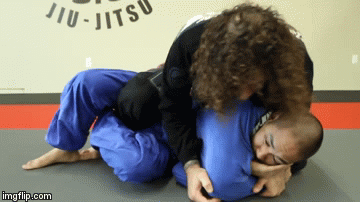
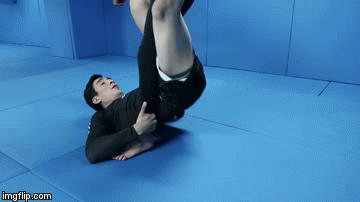
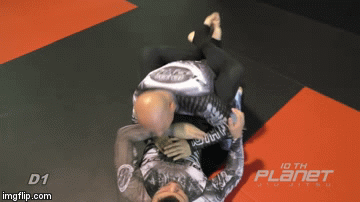
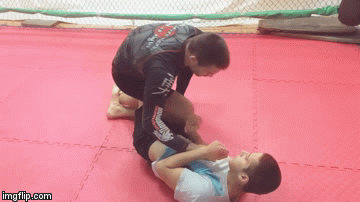
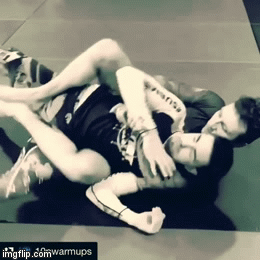
Next, the goal is to get your top hook off and kick their leg forward, as hard as possible. This opens up a path to get your bottom leg back and place your shin as deep as possible behind the knee of their bottom leg. From there, use the other leg to hook and guide their shin towards you. The ultimate goal is to place their toes behind the knee of your top leg. A great tip is to use the top arm to help you pull the foot towards their butt. From there, you’re in a position for a very very nasty and undefendable calf slicer.

The only drawback of this move is that you’ll need to wait until you’re a brown belt to do it. Well, if you’re competing under IBJJF rules, anyway.

The Seatbelt Choke

This move is the easiest solution to most failed BJJ back attacks. The only prerequisite for this move is having a seatbelt grip tight and secure. Hooks don’t really matter, and neither do the arms of the opponent. The seatbelt choke is really really easy and works in both Gi and No-Gi, making the best option to go for when the opponent is unchokable via regular means.

BJJ Back Attacks Seatbelt Choke In order for the seatbelt choke to work, you need to completely abandon back control, apart from the seatbelt, of course. It works best when your opponent has better grips, preventing the rear naked choke. Furthermore, as they manage to sneak out of your hooks, you’ll either have to re-take the back or give it up. Well, now you can also finish directly. As the opponent slips your hooks, let them get out and transition to a kneeling position behind them. From there, make sure the shoulder of your “over” hand ends up behind the opponent’s head. Now, regardless of their grip placement, simply sprawl back and pull the seatbelt as also towards you as possible.

Nasty Armlock

This armlock requires a bit of positioning but is totally worth it. It is the most unexpected of today’s attacks and one that’ll catch everyone. It works when you’re in position for a lapel choke but can’t finish because of the opponent’s grips. The first thing to do is make sure you’re lying on the strong side. Next, use your to arm to control their top arm. However, instead of going under the arm, you’ll go over it, so you can trap the arm between your elbow, knee, and armpit.

BJJ Back Attacks Bent Armlock

This kind of positioning is going to guide your opponent to try to get their hips over your bottom hook. Let them do it. You need your hook out so you can switch your hips to a better angle. Now, while the opponent’s maybe expecting a straight arm lock, due to the trapped arm, you’ll set up a bent armlock instead. Place the wrist of the trapped arm behind your back, placing the arm in an Americana-like position. Finish by guiding your wrist under the elbow, similar to a heel hook grip. A short hip extension and you’ll get a very quick tap.

Twister/ Truck Attacks

BJJ Back Attacks Twister 
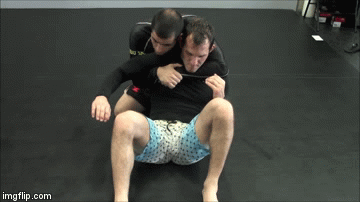
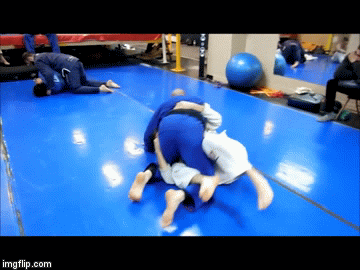
Finally, you can always transition from BJJ back attacks into other highly attacking positions. Actually, you can use the sneaky kamikaze setup to enter into some “grey” zones of grappling. We turn to 10th Planet Jiu-Jitsu once again, this time towards the Twister. While you’re learning the sneaky kamikaze, you’ll have plenty of failed attempts. That means you can either get back into classic BJJ back attacks or transition to the next best-attacking position.

To get the Twister, all you need to do is make sure you keep the leg configuration of the sneaky kamikaze calf slicer. Next, you’ll move your torso sideways to get the angle for attacking the near side arm. Breaking the grip is hard, but there are a couple of really effective ways to do it. Once you have the arm, setting up the Twister is easy. Or, even getting to the Truck position if you so desire.

Solving BJJ Strength And Conditioning Once And For All

During all my years as a BJJ practitioner and competitor, solving the BJJ strength and conditioning puzzle was the hardest thing for me. It turns out, in the very end, I couldn’t really solve it myself. It was only when I found the work of a standout strength coach that the solution presented itself. After all, just like with BJJ, it is best to find a seasoned professional to guide you, rather than discovering things for yourself. Especially when there’s the potential for grave injuries. So I did some digging and came out with a name – Zach Even-Esh. Today, I’ll share with you how his workouts can transform you into a real grappling menace, as well as outline a great program inspired by him. 

Zach Even-Esh is probably the most renowned grappling strength and conditioning coach. For the last couple of decades, numerous wrestlers and grapplers have used his services. While wrestling conditioning is definitely his specialty, he also ha lots of programs specific to Jiu-Jitsu. While not a grappler by background himself, he knows exactly what a grappler needs and how to deliver on those requirements. If you have doubts, just give this workout a try for about 6 weeks. If you do not like the results, you can then give it up. I dare you to do so.

Mike Perry Kettlebells for BJJWhen you’re choosing a BJJ strength and conditioning program, getting one developed by a grappler is the best thing you can do. Moreover, if the program is centered around the use of kettlebells, you should stick to it like flies to s#*t. Well, Mike Perry ticks both those boxes and so does his “Kettlebell Essentials Instructional Guide” DVD set. Exercises, philosophy, workout programs, everything’s there and it’s all specific to Brazilian Jiu-Jitsu.

BJJ Strength And Conditioning – The Challenges

Brazilian Jiu-Jitsu presents a lot of challenges to people trying to get in shape for it. To begin with, doing BJJ is unlike any other physical exercise you can do. This includes other martial arts as well. the thing with Jiu-Jitsu, that you’re moving through all planes of motion, instead of just one, or perhaps two. This makes BJJ strength and conditioning really challenging to begin with.

Next up, it is the focus of your training. Brazilian Jiu-Jitsu requires you to have highly developed aerobic and anaerobic conditioning systems. At the same time, the more relative strength you have the better. Not only that but you also need strength endurance as well as power. And all of that while you’re trying to keep your weight pretty much the same, so you can fit in a weight class.

BJJ Strength And ConditioningWhile you might find a way to figure out a program that addresses all these challenges, you haven’t even touched on flexibility and recovery. NOT only should you be as limber as possible while exquisitely strong, but you also need to be able to take on a huge workload. Both grappling and strength and conditioning sessions need to fit in your weekly schedule, meaning you’ll end up with a lot o do in little time. It is incredible that one man managed to hack the structure of the ultimate BJJ strength and conditioning program. Now, you can reap the benefits of it too.

The Zach Even-Esh Philosophy

Initially, Zach started off as a bodybuilder and a great one at that. However, he soon realized that bodybuilding doesn’t necessarily make you a better athlete. So he switched his attention to finding out a winning formula. In the beginning, he workout out of his garage and yard, preparing just a handful of athletes at a time. Since his philosophies worked like a charm, he soon got too many athletes to fit in his yard. So, he opened a gym. His “Underground” gym is now all over the US, preparing mostly wrestlers of all levels.

What Zach managed to do is figure out the perfect combination of training modalities to prepare people for the demands of grappling. While it may look pretty similar to Crossfit at first glance, it is actually anything but. Unlike Crossfit, Zach has periodization and great workout structure that allows you to grow as an athlete instead of just destroy your body. In short, the perfect BJJ strength and conditioning program.

Recognizing the need for maximal strength, Zach likes to work with the staples of weightlifting. The squat and deadlift are his favorite lifts, and you’ll find them in many of his workouts. Furthermore, he employs calisthenics, mostly in gymnastics fashion to address both range of motion and the need of isometrics. He also throws in kettlebells, medicine balls, and odd objects, thus ensuring your cardio can last for hours. To put it simply, he has the perfect formula for Brazilian Jiu-Jitsu practitioners.

A BJJ Strength And Conditioning Workout Program

So how does a Zach Even-Esh program look like? How often and how hard do you need to train? What equipment are you going to need? We’ll answer all of these questions as this article goes on.

BJJ Strength And ConditioningFor any of these workouts, you’ll either need a basic home/garage gym or any commercial gym. While you need to push the pace and train hard, you’ll never go to failure or exhaustion with these workouts. After all, puking is not the goal here, getting stronger faster and more agile is. Finally, this BJJ strength and conditioning program is split into three training sessions per week, one of which focuses mostly on conditioning and strength endurance. Here’s teh workout program:

Day 1, Week 1

  1. Power Cleans x 5, 4, 3, 2, 1. Drop 15% and hit 3 reps.
  2. Deadlift with Shrugs 4 x 6 – 8 reps
  3. SUPERSET:
    • Bodyweight Walking Lunges 3 x 20 / 20
    • KB hand to hand swings 3 x 10 on each side
  4. Sprints 10 x 100 ft. (walk back to start line, repeat)
  5. V Ups + Band Pull Aparts 3 x 15 each

Day 2, Week 1

  1. SUPERSET:
    1. Floor Press 5 x 3 – 6 reps. 6th set, drop weight & hit MAXIMUM reps
    2. Double Kettlebell Row 5 x 6 reps
  2. SUPERSET:
    1. Mixed Grip Push Ups 3 x MAX Reps
    2. ANY Carry (Keg, Sandbag, Kettlebells, Dumbbells) 3 x 150 ft.
  3. TRISET:
    1. Dumbbell Side Raises 3 x 15-20 reps
    2. Dumbbell Tricep Extensions 3 x 8 – 12 reps
    3. Pull Ups (Slow Motion: 3 seconds up, 3 seconds down) 3 x MAX reps

4. Any Sleds 4 x 200 ft

Day 3 Week 1 – CONDITIONING DAY

BJJ Strength And Conditioning

Do 6 rounds of the following, with minimal rest in between rounds:

  1. ANY Carry (Kettlebells in various positions, Keg, Sandbag in various positions)
  2. ANY Sled (Push or Pull, Heavy or Light, Drag or Sprint)
  3. Bodyweight Push on Odd Sets, Bodyweight Pull on Even Sets

Examples of Bodyweight Push: Push Ups, Ring Push Ups, Dips, Med Ball Cross Over Push Ups

Examples of Bodyweight Pull: Recline Row, Pull Up, Rope Climbs

Day 1, Week 2

  1. Back Squat 3 x 5. Finish with a hard 20-25 rep set at maximum weight you can handle
  2. Sumo Deadlift 3 x 3 Speed. Follow those up with 2 x 2, increase weight.
  3. TRISET:
    1. Knees to Elbows Crunches3 x 10
    2. Bodyweight Lateral Lunges 3 x 5 each side
    3. Cossack Squats 3 x 5 each side

Day 2, Week 2

  1. Turkish Get Ups 5 x 1 / 1 (add weight each set)
  2. SUPERSET:
    1. Barbell Military press 4 x 4 reps. Drop weight and hit MAXIMUM rep set
    2. Recline Rows on rings 5 x MAX reps
  3. SUPERSET:
    1. Kettlebell Floor Press 4 x 15-20 reps
    2. Rear Delt Raise (Dumbbells or Kettlebells) 4 x 15 – 20 reps
  4. SUPERSET:
    1. Heavy Curls 4 x 6 – 8
    2. Lying Tricep Extensions 4 x 8 – 12
  5. Run 800 Meters

Day 3 Week 1 – CONDITIONING DAY

Repeat the same as Day 3 of the first week.

The Best Strength & Conditioning DVD and Digital Instructionals

6 Exercises To Develop Insane BJJ Strength

No Equipment BJJ Workout Ideas For Grapplers

Grappling Strength Training – How To Train Isometric Strength

Kettlebells For BJJ – Become A Grappling Machine

BJJ and MMA Practitioner Kyle Maynard: “Everything is possible is the Biggest LIE”

BJJ and MMA Practitioner Kyle Maynard: "Everything is possible is the Biggest LIE"

Kyle Maynard was born on March 24, 1986, is a speaker, author, BJJ, and MMA athlete. He’s very well known for becoming the first quadruple amputee to ascend Mount Kilimanjaro. He did it without the aid of prosthetics and that’s what he’s talking about in this video. Here is Kyle Maynard’s motivational speech.

“Anything is possible is a lie. I love the spirit of that but I don’t believe it’s true. But what I think is actually more effective is really to go and say to tell the truth to ourselves, to actually know our limits. And to truly know “our limits” we have to go and test those limits. Without that, it’s just an assumption.

The First time, actually, on Kilimanjaro what I thought was I found myself on the fourth night in the trip, and I was completely physically Broken. Bear Crawling for 6-7 hours a day and my arms were swelling up my feet. The pain has gotten to be really intense and I thought “I’m done, it’s only 4 days and we projected that it’s going to take us 15 days to reach the summit”.

I thought that the next day I’m going to get up and I’m going to go and helicopter out. Aconcagua is the same and on the fourth day, and this day, in particular, you see in this photo it was close to 1000 pull-ups through these ice fields called penitents.

You got to the top of this thing, it was a scree field where I’m just sliding down faster than I could go and climb, and all of a sudden I get to the top of this scree field, physically more exhausted than I’ve ever been and my guide yells, “Rock.”. Watermelon sized boulder releases go by a foot away from my head as I dove under a rock. I’m questioning that night too. I was there in my tent lying and crying. I was thinking “why am I here?”

When I was born, my parents had no idea I was going to be born with a disability. It was a very sudden thing…” Check the rest in the video below.

This guy is such an amazing human being worthy of your attention. Listen to him and never quit. Test your limits and achieve anything you want and anything you’re capable of.

BJJ Takedown Techniques – Deconstructing The Snap down

Snapdown BJJ Takedown Techniques

The subject of getting the fight to the ground in BJJ is one that has been beaten to death. We all accept that BJJ is not the most efficient grappling martial art for taking someone down. That said, it does present a solid obstacle for even the most proficient of takedown artists. BJJ players can be notoriously hard to take down when they’re the ones’ dictating rules of engagement on the feet. Throw in some BJJ takedown techniques into that and you’re going to be able to deal with everyone without much trouble. If you’re really interested in dominating every moment when standing you should look into the snap down.

The snap down is one of those moves that people usually skip. Even if they give it a try. BJJ players often get it so horribly wrong that they abandon it quickly. This is a real pity since the snap down is one of those moves that fits perfectly into BJJ takedown techniques. Grip fighting and positional dominance are the two deciding micro-battles that determine the outcome of a standing exchange. The snap down allows you to dominate both, and get the fight to the ground at any moment. On top of that, it is not at all complicated to learn.

Heeadhunter Guillotine Neil Melanson DVD
Techniques List

Neil Melanson is one of the most complete grapplers in the world. he has extensive experience in catch wrestling, BJJ, Judo and Sambo. So when he issues an instructional, you get it and listen to what he has to say. “The Headhunter guillotine Series” is a DVD set in which he goes over everything headlock related, including snap downs.

The Snap Down 

So, what exactly is the Snap down? It is a simple and very effective method of getting your opponent completely out of alignment. The snap down is basically a way of getting your opponent’s head lower than yours. However, when I say lower, I mean really low. Like, face on the mats low. While this is the ideal version of events, in most cases, the opponent will react, opening up a host of attacks. Which is exactly why the snap down is a staple of BJJ takedown techniques.

Snapdown BJJ Takedown Techniques The goal of any standing exchange is to conquer your opponent’s base or posture. In both circumstances, grips play a deciding role. Without them, there’s no way you’re going to get a takedown. The snap down requires you to have one arm on the biceps of the opponent’s arm, and another behind their head. Whether the arm that goes on their neck is inside or outside of their arm is not too important. Both ways work. The important thing is that the snap down position gives you great control over the opponent’s posture. As such, it is the perfect base for executing a number of BJJ takedown techniques. The Gi equivalent is a collar and elbow grip on the Gi.

To get your opponent’s posture down, you’ll need to put in some effort, though. Gi or No-Gi, you’ll have to manipulate the opponent’s base to get their posture broken. The principle of Kuzshi is key here. To get your opponent off balance, you need to stagger their feet first. The snap down gives you the mean to do so by simply going back and keeping your grips tight. Snaping the opponent down from there is all about fast and explosive movement.

BJJ Takedown Techniques 

Taking someone down with the snap down is actually a very straightforward thing. Once you have the grips in you simply step back and to the side a bit to destroy their base. Once you have it, use the arms to pull the opponent’s head and shoulders down. If you go to one or both knees during the process, your opponent will end up on the ground for sure. Even better, they’ll be in a turtle position, with a front headlock readily available for you.

Apart from a direct takedown option, the snap down is the perfect entry to unite a number of BJJ takedown techniques. If there’s one thing that the snap down offers for certain, it is that your opponent is going to end up bent forward. IF they resist the direct takedown, or you cut it short on purpose, they have very predictable options let. The instinctual thing is straightening up in an effort to regain posture. This, however, given the clinch (collar) grip is nearly impossible. It also opens them up to headlocks, arm drags, double and single leg takedowns, trips, Judo throws, and even submissions.

The snap down is more of a position zero for launching Jiu-JItsu attack than anything else. Yes, it is a very viable takedown on its own, but it works much better if you use it to launch other attacks.

Gi and No-Gi Combinations 

Let’s now get into some specific examples of how the snap down can work for you. Firs,t we’ll go over a couple of No-Gi options, before turning to the Gi snap down. Finally, we’ll round off the snap down game with a very cool submission setup that doubles as a takedown too. Plus, it works in both Gi and No-Gi!

No-Gi Snap down To Double Leg

The very fundamental use of the Snap down is without the Gi. This is logical, as it is, after all, a wrestling move. From the basic head and arm tie, the goal is to execute the Snap down as before. Move your feet back sot hat you create space and focus on snapping the opponent down. In order to be heavy, you’ll also need to drop to your knees as you pull. This time, however, you’ll crouch low instead of dropping to the knees.

Snapdown BJJ Takedown Techniques The moment your opponent’s head hits the lowest point, they’ll be looking to get back up right away. Since you’re looking for different BJJ takedown techniques, now, you’ll let them raise. as they do, remain crunched and you’ll find yourself ready to execute a power double without any effort. You can also always switch to a single leg from there, or any other low stance takedown you want.

No-Gi Snap-down To Russian Tie Snap

Snapdown BJJ Takedown Techniques The Russian Snap is one of the most attractive, yet extremely difficult and advanced moves to hit. Still, if you set it up with the Snap-down, your chances of getting it improved very significantly. The Russian Snap requires you to get lower than your opponent while using a wrist grip to flail their arm violently to one side. From there, the goal is to get it all the way to the other side as explosively as possible, while raising your torso. This creates a swinging motion that’s literally going to plant your opponent on the ground.

The snap down is the key part since it creates a position in which your opponent ends up fairly low. From there it’s not hard for you to get lower than them, and use the momentum of them raising up to execute the takedown.

Gi Snap-down To Ankle Pick

With the Gi, the mechanics of the Snap down remain pretty much the same. All that changes is grip placement and how much you can off balance an opponent. Since the Gi creates some slack, if you’re really good at it, you can actually create more Kuzushi this way than in No-Gi. Furthermore, it opens up many more BJJ takedown techniques, as Judo throws now enter the frame.

Snapdown BJJ Takedown Techniques The simplest thing to do is use the snap down a few times so that you break your opponent’s posture and tire them out. Then, when you decide it’s time simply stay on the ground with your knees as they attempt to raise. Unlike in No-GI, here the opponent won’t be able to get back up due to the collar grip. This means their head and knees are now really close, so an ankle pick on either leg is a piece of cake.

Gi Snap down Train Wreck

The train wreck is a takedown that is as powerful as it sounds. It is actually a Judo modification that is very specific to BJJ. And, the snap down makes it a lot more devastating. The idea here is to be relentless in snapping your opponent down, though. The goal is to truly shake your opponent up as you repeat the motion over and over again. Then, the best course of action is to threaten the foot sweep.

Snapdown BJJ Takedown Techniques This will not only have your opponent out of posture due to the snap downs, but also off balance with one foot up. That means you can pull on the collar (with a cross grip) and the sleeve so that your opponent slams to the ground. This is probably the most powerful of all the takedowns stemming from the snap down.

Snap-down To Guillotine 

Snapdown BJJ Takedown Techniques Finally, the simplest thing with the biggest reward. If you manage to snap your opponent all the way down to a headlock, you can focus on finishing directly. Any front headlock choke will do from a position of a kneeling headlock. However, the guillotine choke provides the most bang for your buck. Especially if you executed a particularly explosive snap down. Even better, Gi or No-Gi doesn’t really matter as this works in both.

Finishing is also very versatile. You can finish by sitting down in a regular fashion or try to roll over or to the side. Whatever option you choose, you’ll have to mess things up really big to lose the submission from there.

This Is The Most Powerful Takedown Combo in BJJ

Double Leg Takedown – How to Do It & The Most Common Mistakes

https://bjj-world.com/how-to-make-single-leg-takedown-work/

High Percentage BJJ Takedowns – The Russian Tie System

Leg Locker Diaries: 6 Entries To Ashi Garami

Leg Locker Ashi Garami entries

Do you consider yourself to be a modern-day leg locker? IF you do, it must mean you’re truly a master of the Ashi Garami from every aspect. You know what to look for in the position, you know all the variation and transitions between them. You also know how to enter the position from a variety of other positions. And, of course, most importantly, you know how to keep your opponent there until you secure a lock. Or, is it the other way around? Do you hunt for the lock first and the Ashi Garami second? Let’s see what makes a modern leg locker truly dangerous and how you can also evolve into one.

Today, leg locks are spreading like wildfire through the grappling community. Even the most die-hard, Gi only old school BJJ athletes had to recognize that leg locks work. Or, more precisely, that they work when some people execute them. And the secret that makes someone a good leg locker is now out. It is the Ashi Ggarami, or the positioning leading to leg locks. While this might seem like the solution to the “inefficient” leg locks from before, practical experience shows otherwise. The problem is that people revert to hunting submissions before securing control and still revert to wild, low-percentage moves. Only now do they have a name for it.

Well, if you truly want to be a high-level leg locker, you’ll have to change this approach. And it all starts with how you get into the Ashi Garami variations and how you stay there.

The Modern-Day Leg-Locker

The main trait of the modern-day leg locker is Control. This is apparent to everyone yet it somehow manages to turn into chaos the moment most people try hunting for leg locks. We all know what the Ashi Garami position is, and most of the highest level variations. Yet, for some reason, people focus on the tap much more than how they get it, which, in turn, leads to them losing both the submission and position.

The Ashi Garami positions are not too complicated in nature. This is mainly due to the fact that you can only attack leg locks from a few top angles. This greatly reduces the Ashi Garami variations that work at the highest level of the sport. And the mark of an elite leg locker is the ability to submit other elite grapplers under any ruleset. The Ashi Garami offers a way to keep your opponent pinned while hunting for leg locks that your opponent can’t defend against.

Apart from controlling the mechanics of the Ashi Garami, the way you get into the position is a major factor in the success of your leg locking attempts. Entering the Ashi Garami is actually not hard. The only thing you need is to learn more than one entry and have them from all major positions. For starters, you’ll need to focus on entering from the top and bottom. As you evolve as a leg-locker, you’ll be able to see openings everywhere and even come up with your own.

Getting Into Ashi Garami 

So, what’s the deal with Ashi Garami entries? The thing to remember is that you do not need to be obvious. Getting into Ashi Garami becomes apparent to your opponent fairly soon, meaning they can counter your attempts early. This is exactly why good entries are crucial for a solid leg locking game. Namely, entering into the correct position from the get-go means you won’t have to fight to adjust your control. It also means you’ll be able to hunt for submissions right away.

So, apart from keeping things under wrap, your focus should be on where your hips end. Whether you’re entering from the guard, from a pass, or from the feet, where you place your hips are going to be detrimental to the success or failure of your Ashi Garami entry. The one thing to get right is getting your hip as tight and close to the hip of the opponent as possible. This is going to allow you to enter the position without allowing your opponent to sneak out. It is also going to land you in a position to finish, bringing you a step closer to the title of leg locker.

Butterfly Guard Entry

The butterfly guard seems to be the quintessential position for every leg locker. So, being good students of the “dark arts”, we’ll start there. All joking aside, the butterfly guard is actually a very powerful position. It offers great attacking options while keeping you fairly safe. In terms of leg locks, it is the holy grail for guard positions.

Leg Locker Ashi Garami entriesFrom a basic butterfly guard with one underhook, the goal is to try and sweep your opponent as usual. The trick is to really try and sweep them so that they have to base hard on the sweeping side. AS their weight shifts, the leg that you have the butterfly hook on becomes lighter. This, in turn, means that you can lift it to enter into an Ashi Garami.

The Ash Garami of choice for any elite-level leg locker is going to be the Inside Senkaku AKA 4/11. So, we’ll be looking for that position now. As you have your opponent spread out with their arms on the ground, your task is to sneak your free leg under the leg which you’re lifting of the ground with the butterfly hook. As soon as you clear their knee, you’re all set to retract your legs and alp on a triangle. From there on, you just switch your hips and you have what every leg locker dreams about – an inside heel hook.

Half Guard Entry

Leg Locker Ashi Garami entriesThe half guard is another one of those positions where we end up all the time. So, why not hunt for leg locks from there. Initially, you might want to try different entries into Ashi Garami. this is perfectly ok. However, you’ll soon realize that your best bet is playing butterfly half guard, at least for a short while. This brings both your legs inside the opponent’s legs. If you have any hope of getting to an Ashi Garami and retaining guard, this is your only viable option.

The entry is going to target the free leg of the opponent. As you establish the butterfly half guard, use the hook to lift the leg and use a frame with your arms to push the opponent towards the same side. The goal here is to expose the free leg so that you can slap on an Ashi Garami. Since their leg is on top now, you can hunt for a toehold directly.

X – guard Entry

Leg Locker Ashi Garami entriesSpeaking of open guard entries, the X-guard also ranks very high among leg lockers. The thing that the X guard provides is variety. In truth, it is a position fit for the more advanced leg locker. That said, it is going to work even for those that do not have a lot of experience. As long as you pay attention to how high your hips are.

From the X -guard, you can always attack the leg near your head by transitioning into the Single-leg X-Guard. However, a better option is to lift the opponent at drawing them closer to your head. This gains you access to the far leg which means you can blast both your legs straight up, getting your hip high up on theirs. This is going to both get you into an outside Ashi Garami and get the opponent on the ground.

Entry From The Feet

Leg Locker Ashi Garami entriesTop position entries start from standing. In general, taking someone down and subsequently entering into an Ashi Garami is what you, as a leg-locker should aim for. However, this is not always possible, so you’ll need backup options. One such example is getting an Ashi Garami off a single leg takedown attempt.

Once you have a single leg, and you find it impossible to finish, do not give up on the move. Instead, look to transition their leg to the outside of both your legs. next, make sure you keep the leg tight and use it to pull your opponent on top as you sit down. this is going to et you in a single leg X-guard position. From there on, getting into a straight Ashi Garami is something every leg locker has to know in their sleep.

Backstep Entry

The backstep entry is one of the most useful entries into Ashi Garami you can master. IT works from almost any top position. You can use it against De la Riva, half guard, Quarter guard, etc. You can also use it in conjunction with other Ashi Garami entries to really confuse your opponent.

BJJ Leg Locker Ashi Garami entriesWhen you find yourself in a half-kneeling position with one of the opponent’s legs under control, you should always try to get a straight Ashi on that leg. However, this often time is hard, so what you’ll do is use the position to get the Inside Senkaku. Simply backstep your leg around the opponent’s free leg while keeping their knee in place with your grip. From there on, the inside heel hook is just a butt scoot away.

This entry is one of the favorite ways of getting the Inside Sankaku of Craig Jones. As you know, he is one of the premier leg lockers in the game today.  This entry, along with a dozen other high-level moves are all explained in his “Down Under Leg Attacks” DVD set.

Closed Guard

Leg Locker Ashi Garami entriesFinally, entering into an Ashi Garami from the closed guard is one of my favorite ways to annoy people. When you’re caught in the closed guard, grip the wrist on one arm as soon as possible. Use the grip to position their arm to the ground, so that you can step on it with your foot. Place the foot of the same side leg on the biceps of the arm. Now you’re safe to sit down on your butt and throw the other leg over the opponent’s hips. When you’re stable, simply lay back and the guard is going to pop open.

Now you can choose which leg you want to attack. Place a grip around that leg and turn to that side. this will allow you to sneak your bottom leg over the thigh and lock up an inside triangle. From there on, you can finish from the Inside Senkaku or the Game Over position.

10 Best Leg Locks DVDs and Digital Instructionals

How To Develop A Butterfly Guard Submission Game

Reverse X-Guard Masterclass On How To Attack Leg Locks

Adam Wardzinski DVD – Butterfly Guard Re-Discovered

The Only 4 Leg Drag Counters You’ll Ever Need

BJj Leg Drag Counters

Certain BJJ techniques strike fear in the hearts of even the most experienced grapplers. Amongst those that can terrify anyone, guard passes rank higher than any other technique. Pressure passes, in particular, are the stuff of nightmares for anyone involved in grappling. Take the leg drag pass for example. If you’ve ever experienced a top-level leg dragger passing your guard, you know what I mean. You get twisted up, you’re under immense pressure and all you can think about is letting the guy/girl pass, even at the price of giving away back control. When you’re all packed up in a tight leg drag, you only want it to end, and you’re not thinking about leg drag counters or defending. Well, it’s about time you do something to change this approach.

First of all, you need to make the distinction between guard retention and guard pass counters. Retention means you’re still in guard while countering a pass means your opponent has superior positioning. That merits the use of concep[ts over singular techniques if you are to have any hope at avoiding the pass. The basic concept includes guard retention as the first line of defense, though. Moreover, you need to understand guard passing and leg drag in particular. leg drag counters are only going to work if you know all the phases of the pass, and when you should react.

The Fundamentals of Guard Retention

Guard retention is all about recognizing danger. When you establish a good guard position, staying in it should be your primary concern. Only when you’re certain you have a perfect structure, you can think about going into attack mode. Guard retention means that your opponent can’t find a way past your guard, no matter what they do. To make everything abundantly clear, if the opponent manages to get into a passing position, your guard retention failed.

Once you know that your opponent is passed one of your guard’s layers, you need to think about getting back the proposition. At this point, only guard recovery matters. This is the point of pass prevention. As far as leg drag counters go, this is the most important time to act. Preventing the leg drag before the opponent sets in is the highest percentage counter you can do.

Finally, the best thing to do if your opponent is pat a few of your guard’s layers is to disengage. There’s a point of no return when you’re trying to recover guard. If you go past this point, anything you’re doing is going to have a low chance of success. the best bet is to completely disengage with the opponent and try your luck from a neutral position, instead of a very bad one.

Yet, sometimes you’ll end up in a bad spot, like the leg drag, regardless of your prevention attempts. this is where leg drag counters come into play. They are the final layer of defense.

The Leg Drag Pass

before we get into specific leg drag counters, let’s take a short look at the leg drag pass. The Leg drag is such a powerful pass because it combines pressure with pinning. This is the main issue of leg drag. It places you in a position where your body is not only pinned, but your opponent also has a great angle to place immense pressure on you. Furthermore, they can stay in the position indefinitely, unless you know precisely what you need to do.

The pin in a leg drag pass comes as a result of your body positioning. the main reason this pass is such a successful one is that it isolates your upper and lower body in different directions. While the hips and legs of your opponent keep your knees twisted in one direction, they can use their upper body to pin your torso to the ground, usually in the opposite direction. the spinal twist means your ability to move is virtually not nonexistent.

As if that’s not enough, the opponent can place all their weight on top of you, while using their arms and head to completely immobilize your torso. From there, they can play a waiting game, crushing you slowly with every passing moment until you give up the position.

Leg Drag Counters

Now that you understand the concept and layers of guard retention and recovery and you know the main dangers of leg drag, it’s time to think about leg drag counters. As such, you should know that there aren’t many ways in which you can counter this pass. Even amongst those that exist, only a handful are truly effective against high-level opponents.

As with every defense, we’ll start with how to prevent the leg drag pass. Next up, we’ll explore a couple of very effective counters. One of them is actually a real game-changer, as it’ll get you on the opponent’s back or in a leg drag pass yourself. Finally, before we go into the submission counter to the leg drag pass, we’ll go over some key drills for practicing leg drag counters.

Prevention

Leg Drag CountersSimple prevention is actually the highest percentage counter you can do. The sooner you prevent the pass, the easier it is to replace the guard and get straight back into the game. The key thing to focus on is hip mobility. To prevent the leg drag pass, you need to keep your hips mobile and move as soon as the opponent drags the leg across their body. The goal is simple – place your free foot on the opposite side hip. This is going to provide you with a pivot point to keep moving your hips. In essence, this completely nullifies the leg drag pass, and your opponent will have no choice but to give up on it. If they don’t you can still use the position to get back to guard very easily.

Inverted Escape 

Leg Drag CountersThis escape works off the same movement as the basic prevention. The thing with this is that it completely renders any re-counters useless. The defense starts the same as before, sneaking your leg in before the opponent lowers their weight. Still, this defense uses the fact that the first leg to touch the ground is the one on the drag side. So, as you place your foot on their hip, your arm is going to underhoook the far leg of the opponent.

This not only prevents the leg drag but also gets you in the perfect position to invert. As you do, you must place both hooks behind their knees as soon as possible. From there, you can go into any attack you want, from back takes, to playing guard and even leg locks.

To The Back / Leg Drag

This is the most efficient of the leg drag counters, provided you can execute it. It is not one for beginners, as it does involve some advanced transitioning skills. however, the beginning part of it, with the leg hook, is something you can base most of your leg drag counters on.

Leg Drag CountersAs you find yourself deep into a leg drag, you must remember that you must not allow the opponent to settle in with their weight. To achieve that you must go to your bottom shoulder so that you maintain hip mobility. This will allow you to use the dragged leg to hook their near side leg. Once you have it, simply go to your back and the opponent is going to come right on top of yours. As you circle your other foot inside, you’ll have a choice to make. You can either take the back right there and then, or use the position to sweep and get in a leg drag pass yourself.

Drilling Leg Drag Counters 

Leg Drag CountersDrilling leg drag counters again involve hip mobility. The moment a partner gets the drag, your task is to hip escape and establish a frame. From there, you place your foot in the prevention position. This opens up the opportunity to invert and replace your open guard. As soon as you do it, the opponent is going to go for the leg drag on the opposite leg. This is a drill you should practice as often as possible, preferably every class.

Outside Ashi Garami

Finally, the most offensive counterattack is actually the one that’s a real last-ditch defense. When your opponent has the leg drag all setup, the only hope you have is retracting your leg so that you can place it on their hip. From there, you’ll do the same with the outside leg so that you have a strong structure that can push. The goal is to push their hips back. That way that you can break them down to the ground and get into the outside Ashi Garami.

If you want to truly master this counter, make sure you pick up Eddie Cummings’ “Ashi Garami Seminar” DVD. It features a lot of counter-attacking moves involving leg locks, and the “Wolverine” is a proven authority in the field.

10 Best Leg Locks DVDs and Digital Instructionals

Eddie Cummings Seminar on Ashi Garami & Awesome Heel Hook Escape

3 Ways Of Passing The Half Guard Lockdown

Choose Your Jiu-Jitsu Game: Pass Or Play Guard?

Guard Passes & Leg Lock Attacks – A Deadly Combo

Leg Lock And Guard Pass Combo

Go for a guard pass or try a leg lock? This seems to be the Shakespearean question grapplers around the world face. The modern game of Jiu-Jitsu certainly offers opportunities. Until a short while ago, the answer was an obvious one – guard passes. Lately, it has been all about leg locks from every imaginable position. This includes jumping to your back from a position that’s prime for guard passing. Apart from a few exceptions people seem to be choosing one route or the other, like they’re exclusive options that do not mix together. And nothing can be further from the truth.

The ability to perform leg lock along with guard passes in combinations is a true mark of not only a high-level grappler but a well-rounded one as well. There are still numerous black belts out there who won’t, for the love of God, even talk on the subject of leg locks. On the opposite end of the spectrum, you have the young hungry guys that would give away their right arm trying to emulate Gordon Ryan. Both these trains of thought are actually the opposite of the BJJ philosophy that requires us to be open to experimenting in new directions. It is counter-productive to choose one or the other when you can actually use a leg lock to set up a guard pass and vice versa. Learn how to feed one of the other until you accomplish your goal and leave petty differences aside.

Craig Jones DVD guard Passing
Techniques List

Australian rising grappling star Craig Jones offers his two cents on how to mix leg locks and guard passes for deadly efficiency. Check out the “How To Pass Guards Quickly And Easily Using leg Attacks” DVD set by Craig. It contains all the information you need on connecting these seemingly opposite aspects of Brazilian Jiu-Jitsu.

Getting The Best Of Both Worlds

Let’s go deeper into exploring where and how leg locks and guard passes interact. The original resistance towards going for a leg lock off of guard passes is due to points. Entries from the top were considered to be a move that only gave away free sweeps. In all honesty, this was the case until leg locks turned into a complete system. Now, with the Ashi Garami position as the base for all leg locking attacks, this is no longer the case.

On the contrary, modern leg lockers seem to be doing the same thing they’re so vocal about. Whenever most people interested in leg locks are in a solid guard passing position, they jump straight into leg locks, not looking at the bigger picture. This might have been a good strategy before people learned leg locks. Now, if you give away the top position to attack leg locks, and your opponent defends successfully, you’ll end up on the bottom with nothing to show for your efforts.

The strategy to utilize the best of both worlds seems to be an obvious one. However, it takes checking your ego a bit more. Instead of stubbornly hunting foot locks, or just pressuring a pass, look to integrate both approaches. The benefit of doing this is that you’ll be able to get one of the two, thanks to the fact the opponent can’t defend both. It won’t matter how big, strong, or experienced your opponent is, attacking with a leg lock and guard pass combo is certain to get you one.

Combo 1: Guard Passes Into Leg Lock Attacks 

Against freakishly flexible good guard players, leg locks are a great option to submit or divert their attention for a pass.

Guard Pass And Leg Lock ComboOne great example is the lasso guard. Opponents that play open guards, often revert to the lasso guard to prevent guard passes. Granted, this is a gi-only guard, but it is a very annoying one at that. If you’re up against a De La Riva guard, for example, chances are you’ll end up in a lasso if you press the pass too much. The solution here is easy and perfectly legal – an Estima lock. When your opponent gets in the lasso guard, they place the foot perfectly for this leg lock. All you need to do is place a figure four grip and pin their foot to your belly.

Guard Pass And Leg Lock ComboThe knee slice pass is also one that has been used so much, that there are countless options for defending it. This means that finishing this pass can be extremely challenging. To make the most, all you need to do is ensure that you end up in quarter guard, or just get their knee behind your butt. They might even do it themselves since there’s a defense in that direction. This opens up a backs step option that doesn’t have a pass as its goal. Instead, it’s a gateway into the 4/11 position from where you can wreak havoc on the opponent’s legs.

Guard Pass And Leg Lock ComboLast but not least, the half guard. If there’s a position where you can get stuck, it is in someone’s half guard. When passing the guard seems like an impossible thing, you can turn to a toe hold to solve your problem. A rolling toe hold attack on the top leg is a certain way of getting either the lock or subsequent guard passes.

Combo 2: Leg Locks To Guard Passes 

On the other hand, leg locks can easily turn into very potent guard passes if you’re willing to transition. Most Ashi Garami positions offer such control over a leg, that switching to the top position land you either directly in a guard pass or very near one.

Leg Lock And Guard Pass ComboLet’s start on the 411. You’re up against an experienced leg locker that knows how to defend every nook and cranny. In most cases, an opponent defending will cross their feet in a triangle. This will only help you. All you want to do is get the reaping leg out and pull it back with a technical stand-up. You’ll end up in a combat base deep in a leg drag pass position right away!

The toe hold is another great and legal option you have to pass a guard. Remember that pesky half guard? Well, when you hit the toe hold a few too many times, people will start defending it. The one thing they can do is extend their leg to prevent you from gripping. This action, however, breaks the structure of their half guard. A hip switch and your knee is free of the half guard. Furthermore, you’ll have control over their far side leg, making passing a real breeze.

Finally, you can always decide to actually pass the guard after a backstep 4/11 entry. If you feel your opponent is placing leg lock defenses straight away, like clearing the knee line or triangle their legs, it means they can’t defend guard passes. Simply get your hips down to the other side and keep controlling the near side leg until you pass into side control.

In Summary

Let’s recap. Guard passes work. Leg lock attacks, as we well know, work too. So, logic would have it that combining two things that work should provide you with an even better option. Remember, there’s no need to stick to the “old-school” BJJ ways. There’s also no point in only looking at one aspect of modern grappling, like leg locks. Instead, try to combine them all into deadly combos that will ensure you get a result.

10 Best Leg Locks DVDs and Digital Instructionals

Leg Lock Counters To The Single Leg Takedown

Reverse X-Guard Masterclass On How To Attack Leg Locks

Imanari Roll Breakdown – The Most Attractive Leg Lock Entry

How To Prevent And Pass The BJJ Deep Half Guard

BJJ Deep Half Guard

The BJJ deep half guard is a position that many of the most successful competitors use on a regular basis. It keeps the bottom person in complete control of what is going on in the match. It can slow down even the most agile of grapplers, and it is a position to sweep virtually anybody. You can see why lots of world champions have the tendency to go for the BJJ deep half guard whenever possible. And not just world champions, but more and more competitors of all levels seem to gravitate towards this position. Which makes passing it a real problem. 

To say that passing the BJJ deep half guard is an easy task would be a lie. It is a guard that’s going to take a lot of careful maneuvering and precise details. If you get even the slightest detail wrong, you’ll be flying faster than you can realize what’s going on. Passing the deep half requires you to discover exactly where your balance is and how to keep adjusting it until you win the structured game. One thing to remember is that, while the BJJ deep half guard is a dangerous position, once you manage to establish a few key elements, you’ll render it useless pretty quick. However, given its dynamic nature, it is easy for an opponent to get you back, so any passes or counterattacks need to be fast and deliberate.

Bernardo Faria DVD
Techniques list!

Speaking of world champions that excel in the deep half guard position, Bernardo Faria is a 5 times world champion whose deep half game is second to none! His “Battle Tested Half Guard” DVD set features the deep half heavily, including some passing principles. It is the ultimate guide to the deep half guard position by far!

BJJ Deep Half Guard Trouble

The BJJ deep half guard presents a very difficult puzzle to solve because of two main issues. The first is the fact that your opponent has what is the ultimate Jiu-Jitsu position – underneath your center of gravity. Furthermore, they have incredible dynamic control over your base thanks to the leg lever. Let’s look at both these problems deeper.

BJJ Deep Half GuardThe positioning problem is the first crucial problem and is actually the first one you need to address from the top. The positioning of the opponent below you, while keeping your thighs apart is a superior one in any grappling martial art. This means they’re directly under your center of gravity and need next to no strength to manipulate your balance. The more control over your center of gravity an opponent hs, the easier it will be for them to sweep you.

As if that’s not enough, the position offers incredible control over both your hips. The reason for this is that from the deep half position, your opponent has direct control over one of your legs. It includes controlling the lower part of the leg with their feet, and the upper with their arms. Moreover, they can control the other hip directly with one of their arms. As long as the opponent has the correct grips, you won’t be able to move an inch without giving away a sweep or transition. What’s worse is is that the opponent doesn’t have to wait for you, but can create Kuzushi at any time.

Position Zero

In accordance with the two main issues the BJJ deep half guard presents, you’ll have two specific tasks from the top as well. Your first task is to stabilize your position. Your second task is to neutralize the opponent’s possibilities. Once you’re able to achieve them, you can start thinking about passing, or getting into a superior position.

BJJ Deep Half Guard PassFirst, remember that you need to find a way to get your hips over the opponent’s central line. This is the line that vertically divides their torso into two even halves. Your goal is to get your hips towards the side that’s nearer to you. This should be done fairly early, though. In order to make sure you prevent your opponent from sneaking underneath you, the first order of business is head control. You’ll need to get your near side under their head, like for a classic cross-face. At the same time, sprawl back as hard as possible. This won’t get you out straight away, but it is going to prevent the opponent from establishing full BJJ deep half guard.

BJJ Deep Half GuardIf you can’t get your hips back, you must think about going up and over. That means raising your hips off the ground as high as possible. This takes away their control and allows you to use the knee of your trapped leg. The goal is to get that knee to the ground, ending up in a three-quarter mount position. While this is not the best position to be in, it certainly is one that can allow you to focus on passing the deep half, while keeping you safe. If you’re looking for a better position zero to pass the deep half, you’ll end up disappointed.

Sweep Prevention 

Out of the many sweeps available form the BJJ deep half guard, most aren’t going to work form one of the two above positions. With the exception of the waiter sweep. The waiter sweep is one of those absolutely undefendable sweeps if you let the opponent get past the point of no return. For information purposes, this is the moment they get a grip on your trapped leg after bending it. The reason this sweeps works despite you somewhat recovering balance is the underhook grip under your thigh. This is what gets your opponent the anchor they need to leverage your extended leg into the waiter sweep position.

BJJ Deep Half Guard CounterSeeing as it’s notoriously hard to defend, you have two main avenues of approach. There is a safety zone, but you’ll need to really master it in order to stay there. Even then, unless your opponent gives up on it, you won’t be able to do much. The one thing you must do to secure position lifts the opponent’ head as high as possible off the mats. Also, make sure you trap their foot under your armpit with your elbow. However, your only viable option here is actually going down. However, there’s no need to give away a sweep when you can get a submission instead.

BJJ Deep Half Guard Leg LockOr, you could choose the easier option. Let your opponent get you off base and start the sweeps. the moment the start swinging up, use the fact one of their legs is swinging and snap a toe hold on it. They won’t get seep points because they’re not going to be able to stand up and you get a submission anyway.

Passing And Counter Attacks

BJJ Deep Half Guard Pass to BackOn a more attacking note, once you get a position zero, you can think about attacking. One great thing to go for, from the sprawl and head control position, is a back take. The focus here is on the Nar sid arm, which you need to lift and get over and around your opponent. To make things clear, you need to get them into the gift wrap position. This will enable you to enable you to get a seatbelt grip which, in turn, enables you to get the hooks in and establish back control. The best thing about this is that you get full points for the back and a great position to finish from.

BJJ Deep Half GuardAnother solid option is to go for a direct submission. This is going to ensure that you get a pass, at the very least. When in the BJJ deep half guard, aim to get an underhook on the far side arm of the opponent. This will allow you to get tight control over the arm. From there, lift your hips up and slide your bent leg over the opponent’s head. You’ll end up in a near armbar position. From there; it is easy to free your trapped leg and use it to finish the armbar. Or, if the opponent tries to counter or escape, you’ll get side control for sure.

The Best Half Guard Instructionals:

Half Domination by Tom DeBlass
Lucas Leite’s Coyote Half guard
The Battle Tested Half Guard by Bernardo Faria
The Z-Guard Encyclopedia by Craig Jones
High Precision Half Guard and Reverse Half Guard by Jake Mackenzie
High Precision Half Guard by Jake MacKenzie Vol. 2

Related Articles:

Going Deep – A Study Of The Deep Half Guard In BJJ
The Dual Nature Of The Jiu-Jitsu Half Guard

The Great Half Guard Retention Video
High Precision Half Guard 2.0 – Jake Mackenzie DVD Review

Bernardo Faria DVD: The No-Gi Half Guard REVIEW
REVIEW: Craig Jones DVD – The Z Guard Encyclopedia
REVIEW: Battle Tested Half Guard – Bernardo Faria DVD Review
Tom DeBlass Half Domination DVD Review

Deep Half Guard in BJJ – Everything About

REVIEW: The Butterfly Half Guard DVD Instructional by Tom DeBlass

The Only BJJ Half Guard Sweep You’ll Ever Need!