


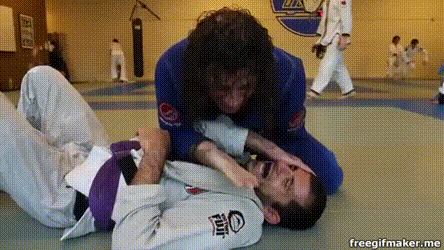
Being lean is not just a physique goal. For grapplers, leanness translates to better performance, better weight management, and improved overall health. It affects how you work on the mats and how you feel about them. So, fat loss is an important thing for BJJ athletes due to multiple reasons. As such, the key factor in shedding some fat is predominantly nutrition. That said, exercise does play a key part of its own in a grappler’s fat loss quest. In terms of physical activity, not all exercises are right for both fat loss and BJJ performance.
Additional conditioning is something people that train and compete in grappling take for granted nowadays. A good conditioning plan should be a part of any grapple’s lifestyle. However, there’s a correct way to set it up and then there are all other ways. When you set up a training program you want to get the maximum benefits out of it. That means becoming stronger and better conditioned for BJJ and achieving the optimal bodyweight for your division. Furthermore, you need to have short sessions that give you the most bang for your buck. SO, how do you factor in fat loss, conditioning improvements and minimal training time into a single workout?
The answer to this question involves a few steps. First, you need to understand how fat loss works. Then, you need to know what a realistic goal for you is. Furthermore, you need to know which exercises work for fat loss and how to program them. Furthermore, the exercises you choose should also help you improve your performance on the mats. And, finally, you need to find a way to fit them into a compact workout format.
The Mechanism Behind Fat Loss
So, let’s start at the beginning. What is fat loss and how can we achieve it optimally? Let’\s clear up a common misunderstanding first. Fat loss and weight loss are not the same things. The point with fat loss is to keep as much of your muscle mass as possible and drop a few pounds of only fat.
That said, the basic mechanism behind fat loss is fairly simple. Expand more energy that you put in and you’ll start losing weight. You notice I said losing weight, not fat. A negative energy balance means your body is going to lose weight in order to adapt and find balance. As a result, excess fat is going to be among the first things to go, but so is some muscle. This is not what grapplers are after.
Now, achieving an energy balance can be done in two main ways. One is through nutrition when you eat fewer calories than those you need on a daily basis. For athletes, this is very rarely a good idea. The other method is to use exercise in order to raise metabolic demands. This is a much better idea as it allows you to have a richer nutrition plan. On another crucial note, correct exercise helps you preserve muscle while allowing almost all of the weight loss to come from fat stores. This is the “silver bullet” combat athletes are looking for.
The Best Fat Loss Exercises For Grappling Conditioning
As we said earlier, the point of a conditioning system for BJ is not just dropping the pounds. You could achieve fat loss with good nutrition and only a running program. However, this doesn’t translate best to Jiu-Jitsu. What works here is choosing exercises that’ll help your body perform better under the stress of grappling.
There is one more variable we need to factor in here – time. Brazilian Jiu-Jitsu training requires a lot of hours on the mat. Factor in daily chores and you’ll be pressed for time. In order to avoid fatigue and overtraining, you need to keep conditioning sessions short and maximally effective. This is where exercise selection and programming come in.
The following exercises should be performed as a circuit. that means doing one and going straight to the other without any rest. The goal is to hit 30-60 seconds of work on each exercise and move on to the next. Only after you finish the circuit can you rest for up to 2 minutes. Then get back in and do it again for a total of three times.
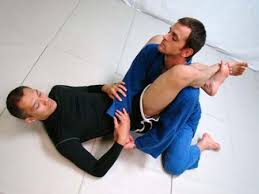
Technical Stand-Ups
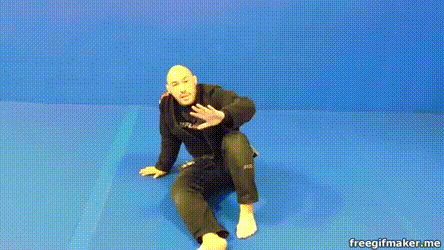 The first exercise on our list is a BJJ classic move. Technical stand-ups are a key BJJ movement that helps with transitions, sweeps, and counters. It is pretty much a part of everything you do while rolling. Doing this moving solo is a great way to get improve muscle memory. It is also the perfect conditioning exercise as it involves level change and whole-body involvement.
For a technical stand up lying on the ground and use one elbow and then the palm to sit upright. From there extended the same side leg forward and place all your weight on your other foot. The goal is to lift yourself up on your palm and opposite side foot and slide out the extended leg. Return and repeat on the other side.
Aligator Crawls
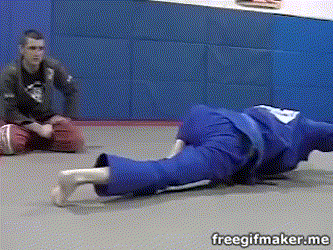 Animal drills are a huge part of Jiu-Jitsu training. They’ve been involved n some form in every BJJ warm-up routine across the world. IN terms of BJJ mechanics they provide a challenge for the whole body. The benefits are in the form of coordination, agility, and improved overall strength endurance. Along with, of course, some very effective fat loss.
For the alligator crawl, you need to start in a pushup position. Raise your body like for a pushup but stop halfway up. Then extended one arm as far as possible in front of you. Touch the elbow of your other arm with the knee of the same side leg. This is your starting position. To crawl forward switch the positions of your extremities by extending the bent arm and leg. Crawl for the prescribed time.
Rolling Chair Sits
The chair sit is another of those BJJ moves you find everywhere. From sweep execution, through bad position escapes all the way to speedy back takes, the chair sit is a multi-purpose movement.
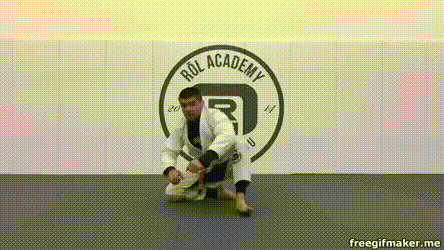 To train it you need to start lying on your back. Use your legs to swing forward, bending one leg as your doing so. The shin of the bent leg should go to the mat, providing a base for you to slide on. Your other leg steps in front, in a lunge-like position as you extend your hips forward. From there, roll back as in a break-fall and repeat to the other side.
Bridging
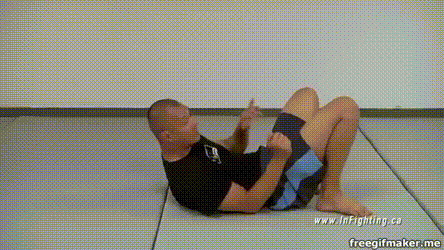 The bridge, or as Brazilians call it, the “Upa” is as fundamental a BJJ move as it can get. Literally, everything you do in Jiu-Jitsu feeds of your bridge. More importantly, this movement pattern works your hip and glute power which are the main source of power for grappling.
No need to explain this move too much. Lie on the ground and extend your hips upwards, lifting yourself on your feet and shoulders. Add in a twist to each side to mimic BJJ movements even better.
The Shoot & Sprawl Drill
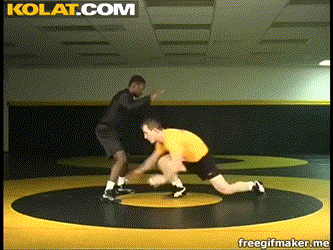 This is where fat loss is really going to kick in. This drill is a mainstay in wrestling gyms around the globe. It improves explosiveness, reaction time, it’s a hell of a cardio exercise and is crucial for your standing game. With it, you train both takedown offense and defense at the same time.
The name says it all really, For this drill you start standing and then step forward with one leg, immediately lowering that knee forward on the mat. Instead of allowing your weight ot hit the mats, throw your other foot in a forward lunge and stand up immediately. The moment you up explode back into sprawl and return to the starting position. This one is really going to push you to the limit.
Granby Rolls
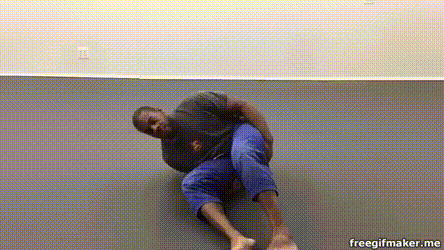 After the exertion of the previous drill, the Granby roll comes in as a welcome rest. The grappling application is immense, as this movement is the base of a successful guard game. Once you master the Grandy hardly anyone is going to be able to pass your guard.
For the drill, start seated and bend forward, putting one shoulder all the way to the ground. Rollover your shoulder all the way to the other side, extending your legs over your head. remember that your feet are supposed to touch the floor at all times.
Deck Squats
One final screamer exercise to leave you exhausted and a pound or two lighter. Deck squats are a basic gymnastic strength exercise and one very useful to BJJ. They are perfect to get out of scrambles r finish certain sweeps. They also tax the whole body and involve a level change and a roll.
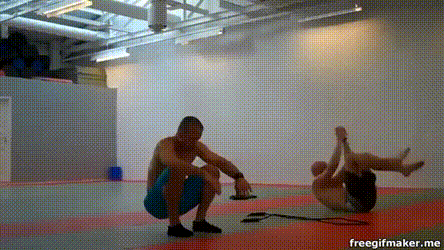 Execution is easy but requires coordination and flexibility. You start standing and then bend your knees aiming to touch your butt to your heels. Once as low as possible rollback so that your legs go over your head. Use your legs to get straight back into a low squatting position and stand up. Remember to keep your core tight and not swing your arms for momentum.
Related Articles:
No Equipment BJJ Workout Ideas For Grapplers
Jiu-Jitsu Workout To Lose Fat and Improve Performance
Brutal Sprint Workouts For Jiu-Jitsu Conditioning
The 6 Exercises To Develop Insane BJJ Strength

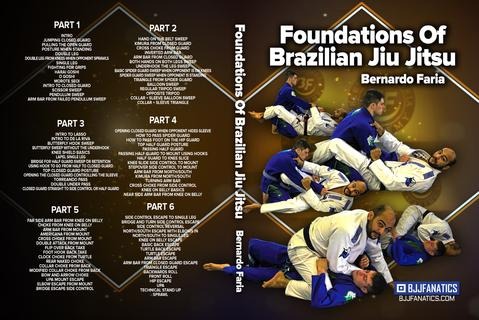


 Volumes three and four are dedicated to the elusive loop choke. Plenty of people tend to get this move wrong, especially at the highest levels. The devil, as always is in the details and nobody knows them better than Alexandre Vieira. Once again he begins by explaining the traditional way of setting up and finishing the loop choke. He goes really deep into it, dedicating the first third of the volume to dissecting the choke’s mechanics. Then, he moves on to demonstrate his own personal way of setting it up along with a cool drill to help you master it faster.

 Setting up the choke requires you to place a grip on the back of the opponent’s lapel, right down the middle of it. The gripping point is exactly in the middle of their neck. As with every lapel based BJJ choke, the deeper you grip, the better. In order to place this grip, you’ll have to raise your butt slightly off the ground so that you can thread you free arm through. Never let go of the trapped arm while doing this, or you’ll have to reset everything. The path of the arm is under the opponent’s trapped arm armpit and all the way on the back of the lapel. The grip is four fingers in, thumb out. Once you have it, get your butt back into side control.
 Finishing the paper cutter choke involves grabbing the collar on the far side shoulder of the opponent. Your first arm (the one under their head) should already be in place. This grip is a thumb in, four fingers on the outside. Once you have it, all you need to do is clear the head, bringing your forearm across their neck.
 First and foremost you need to understand that you’re going for an air choke with this one. It involves placing unbearable pressure on the windpipe of the opponent, cutting off the air supply. Once you have the choke in place, your first finishing point is to place the elbow of the choking arm on the mat. Once you have it, this is where you’ll get most of your taps. However, in order to make it effective, your weight has to be behind the elbow as well. In that sense, you mustn’t allow yourself to slide away from the opponent when doing so.
 The final finishing point of this BJJ choke is the twist. Once your elbow is on the mat and you have your weight forward, you need to twist your torso so that you’re looking towards the opponent’s legs. This is going to dig your elbow in the mat, providing that throat rushing pressure you’re after. Only at this point, if the choke is lagging, can you think about squeezing.
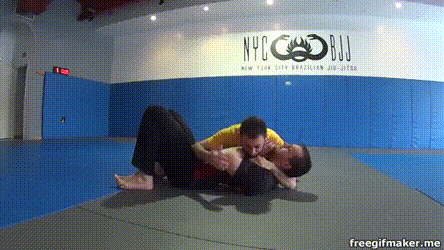 For the First variation, everything is the same up to the point of establishing grips. Since there’s no Gi, you’ll be looking to establish a palm to palm grip on the far side of the opponent’s head. Once there, finishing is exactly the same, and even faster due to the tightness of the forearms.
 When you’re looking to get even more brutal, there’s a very cool variation I particularly enjoy using. This one is going to take some time to master since you’ll have to find your balance point. Once you get that right, you’ll be unstoppable. With this variation, you use an S-grip to connect your arms behind the opponent’s neck. The best placement is at the same spot as a lapel grip would be with the Gi. The S-grip allows for enough mobility to lift your butt completely in the ear. This, in turn, opens up space to place your near side knee straight on the opponent’ neck. For balance have the top of your head on their sternum.
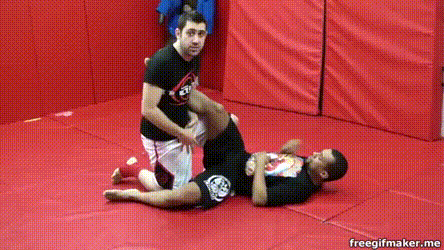 The Sambo knot position is essentially a knee reap position, where your leg goes over the outside of the opponent’s knee. Once there, the aim is to thread your leg all the way through and hook it under their opposite side leg. The only way you can do this without destroying their knee is by placing the shin of their first leg in your hip. Right there, you have the principle of a bent leg, crucial to executing BJJ leg locks.
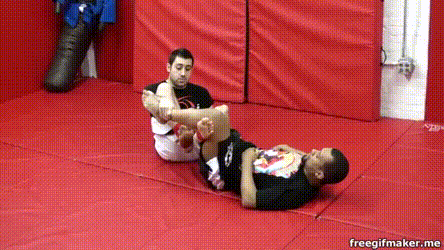 Furthermore, you also have complete control over the second leg. Once you hook the bottom leg, your free leg is going to go over their shin. The goal here is to lock your feet, thus creating a closed system. You have the reinforced wedge principle as well as total control. Pushing your butt towards theirs only increases pressure on their leg and increases control.
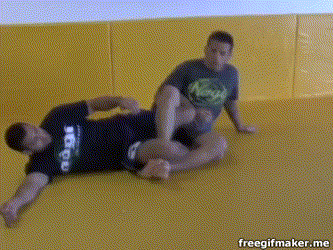 In the modern BJJ leg locks game, people often disregard the ankle lock. Yes, it is a lower percentage move, but lethal nonetheless from the right position. How to get the ankle lock when the foot is on top, though? As you do it from the bottom, with just a slight breaking mechanics modification. Namely, throw your arm around the trapped leg and place your forearm right above their heel. After you connect your arms, you’ll need to go for a break by pulling your arms up and twisting your torso to look away from the opponent. As a bonus pain point, extend your legs while doing so.
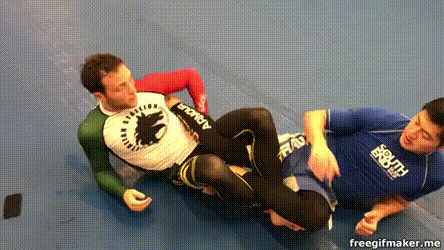 Finally, the outside heel hook. Once again, everything you need is there, you just need to use the correct grip. A Butterfly grip is going to be much tighter than a regular palm-to-palm grip There’s also the reverse butterfly grip but be very careful with it in training!
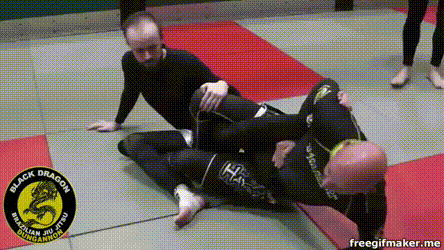 To be certain of the submission, be aware that the Saddle is just a few short steps away. If you want to finish from an upside-down Saddle position, all you need to do is lie back until the trapped leg pops. Once it’s at your chest level, simply place it on the other (bottom) side. Boom, you’re all set for an inside heel hook!
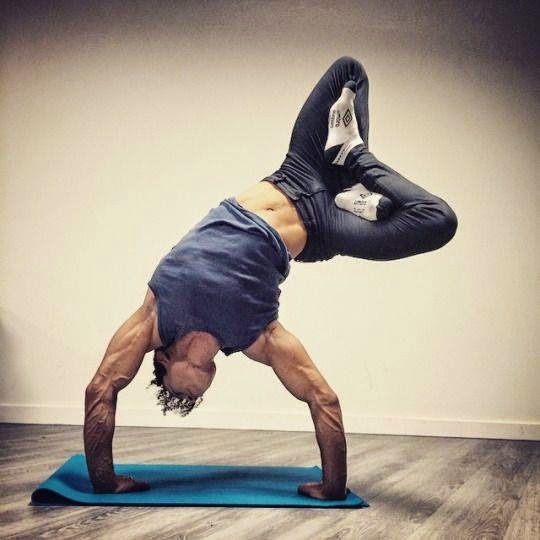 Rickson’s approach involves training a lot of natural movement patterns while focusing heavily on your breath. Granted, training movements require space as you need to tumble, roll, and jump around. What it offers in return is a complete BJJ workout with absolutely no equipment at all. It also has the added benefit of being highly individual, since you can choose your favorite movement patterns.
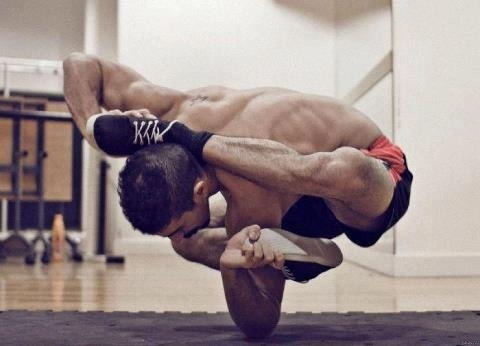 The most obvious representative here is, of course, yoga. Yoga is a very popular way of limbering up among grapplers. The reason behind this is that Yoga, much like gymnastics, gets the body in similar positions as Jiu-Jitsu. This means the adaptations carry over to the sport. Now, while it is smart to take a few classes before doing it yourself, you could just train Yoga from videos. Just make sure you start at a level appropriate for you.
 Finally, it’s time to discuss the gas tank. If you’re truly good at Jiu-Jitsu, you most likely do not need to have high-level cardio. however, even the most elite black belts end u in scramble-heavy matches sometimes. This means you need to be able to push the pace when the occasion arises. Your best bet? Sprints. Get out, warm up, and go for a few sprints. Have an elliptical or a bike at home? do the same. IF you’re not a fan of sprinting or have bad knees, revisit the mobility protocols we talked about.


 The cervical spine is made up of 7 vertebrae. The thoracic spine has the next twelve, and the lumbar spine has 5. Out of this three, the thoracic spine’s strength and mobility are the biggest factors of BJJ posture. Each thoracic vertebra connects to a rib on both sides.Movement patterns of the thoracic spine are all three-fold: flexion, extension, and rotation. It also has to work optimally with the two other major spinal segments.
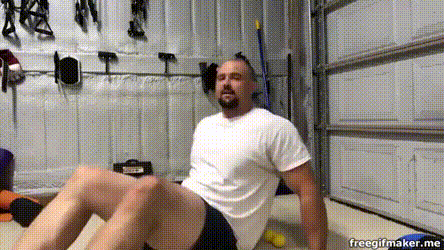 Place a couple of lacrosse balls at the beginning of the thoracic spine just below your neck. Make sure you have your arms folded across your chest. Next, bridge over the balls and hold the top position for a second. Returning to the starting position.
 Lay on a bench, face down, and extend your arms in front of you. Take a small weight in each arm or just keep your hands empty. Next, row the weight until your thumbs reach your armpits. Hold the position and keep your scapulas squeezed. Hold each rep for 5 seconds and go for 3 sets of 5 repetitions.
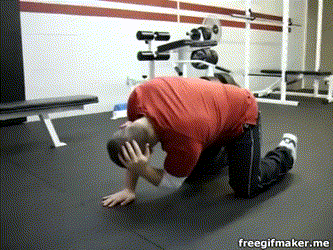 Start in the quadruped position, your hands and knees on the floor. then, take one hand and place it behind your head. The goal is to try to touch your elbow to your opposite arm beneath you. Return to the starting position and try o open your chest more with every following repetition. Keep a calm breath and go for 3 sets of 5 reps once more.