The Paleo Diet For A Sustainable BJJ Lifestyle

Paleo Diet For Grappling

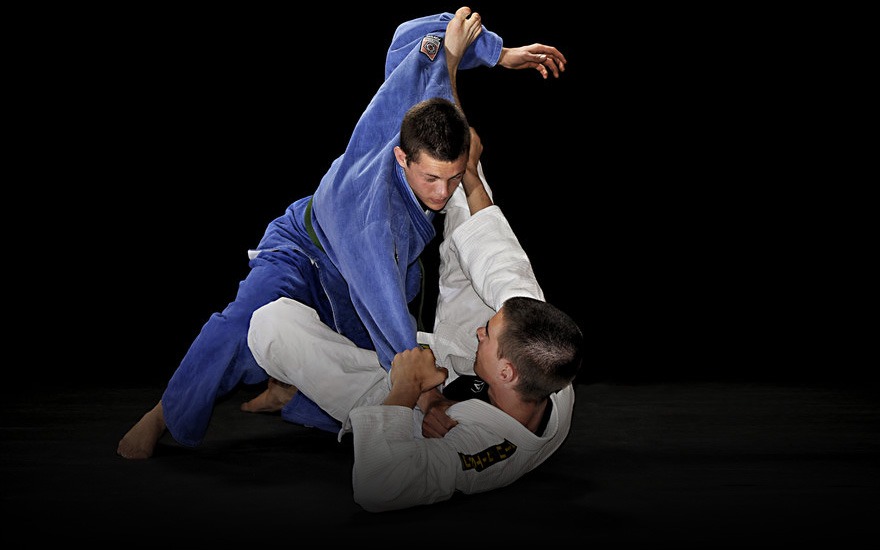
Having the energy for Jiu-Jitsu training often requires you to go out of your way in terms of nutrition. In today’s world, there are literally thousands of diets and methods to choose from. What they all have in common is their claim to be better than every other method. Regrettably only a few are functional, and a true reigning champion among diets is yet to be declared. When it comes to grapplers food turns into more than just a way to drop a few pounds. It is a very important fuel that needs to keep our bodies running. the modern day Western diet just won’t cut it. Neither will plenty of the other common dietary approaches. However, among all the ruble there are a few nutritional gems. One of them is the Paleo diet.

Although the Paleo diet has its shortcomings (which we’ll mention later) it does provide grapplers with more benefits than other approaches. For most people, a regular day means early mornings, family, work, and more family obligations on either side of a BJJ class. A day like that requires a lot of energy. In the same time, there’ not a lot of time to go cooking specialized meals that take hours to finish. The reason why the Paleo diet works is because it is simple. And we already know that in BJJ, the simpler the technique, the better it will work. Now let’s dissect the Paleo diet and see how it can be modified t fit a BJJ lifestyle.

The Nuts And Bolts Of The Paleo Diet

‘Paleo’ is short for ‘Paleolithic Diet’,  a dietary approach that tries to mimic the eating habv\its of people from the Paleolithic period. Or at least it claims to do so. Since we don’t exactly know what people ate back then, the Paleo approach is based on guesses. There are, however, nutritionally healthy ones, making this a very viable approach.

This dietary philosophy is in a way an extreme reaction to the modern lifestyle that. There’s no place in for fatty fries, high fructose corn syrup, and lab-grown burger patties. So, the Paleo diet is all about bringing back the eating habits of old. Real food over conventional food.

When we’re talking about Paleolithic age, we are talking about the hunter-gatherer days of humanity. That’s the period everyone ran around wearing fur skins and bashing giant mammoths with clubs. Paleo is a philosophy that encourages humans to eat the foods we have evolved to eat. is Then the main notion is that the foods we have not evolved to eat (processed foods) are damaging our bodies.

The whole point of the Paleo approach is to completely avoid processed foods, which harm our bodies. It also advocates the removal of all grains, which we have not quite evolved to easily digest.

There is actually a whole ‘range’ of Paleo approaches, from a more relaxed Paleo approach to the more hardcore version which completely “outlaws” dairy, legumes and other food types that most people would consider part of a healthy diet. Basically, if your hunter-gather caveman ancestors didn’t eat it, you can’t eat it either.

Paleo Diet

Benefits Of Going Paleo

The Paleo diet is mainly made up of whole foods. Yes, there are some like some condiments and sauces, but the vast majority should be made up of natural, unprocessed food. The main benefit here is that you’re getting rid of preservatives, additives, artificial flavorings sugars, excess sodium, etc. You’ll basically end up cleaning your eating habits by putting good quality fuel into your body.

Avoiding processed foods means that your calorie consumption tends to drop dramatically. People who simply replace processed food with whole foods often lose weight quickly. The reason is that replacing processed foods full of fats and sugars with more nutrient dense food choices reduces your calorie intake. This, in turn,  increases the number of quality nutrients and makes you feel fuller for longer. So, you’ll eat more )quality) by eating less (quantity).

Another great aspect of the Paleo diet is increased protein intake. The Paleo diet emphasizes lots of protein, mostly from free-range animals and non-processed dairy. When you cut out the starchy carbs from dough-based foods, you often tend to make up with more protein and fats. If you think about what you usually eat, a major part of your diet is likely starchy carbs. These are noodles, bread, rice, potatoes, and the like. When you remove these carbs, you have to fill the dietary gap. A major part of that something else tends to be larger protein quantities during meals.

There’s a number of key benefits to increasing the amount of protein in your diet. It helps build and repair muscles. It also takes more energy to digest protein, which is a good thing if you are trying to drop weight.

A Healthier Lifestyle

The first assumption about Paleo people is that the diet is all about protein and fats. While this is true to an extent, a side effect of cutting out complex carbs is that you replace them. Paleo focuses on simple carbs which are more easily processed by the body. Because you get all of your carbs from fruits and vegetables, your micronutrient intake is going to increase significantly.

Often people only look at the basic macronutrients, those being carbohydrates, fats, and proteins. However, the micronutrients (vitamins and minerals) are also very important for keeping your body running smoothly. They’re charged with boosting your immune system and aiding in the processing of macronutrients. Which brings us to digestion.

Paleo Diet

Removing starchy carbs and processed foods can reduce bloating, gas, and increase absorption of nutrients. Processed foods, in particular, cause inflammation in the gut. Celiacs (gluten sensitivity) is one condition that benefits greatly from the Paleo diet Furthermore, exclusion of processed foods and starchy carbs means it’s easier to digest your food. Thanks to this, you’ll likely experience less inflammation in your digestive tract. Fibrous vegetables, drinking lots of water, and minimizing salt content can reduce your stomach bloat and keep your gut microbiome in balance.

Paleo Diet Modifications For BJJ

If you are trying to do a low-carb diet, Paleo makes it particularly easy because you’ve already cut out the majority of starchy carbs. Paleo is not inherently low carb, though you generally eat fewer carbs while on it. In certain cases, this can be an issue for grapplers. The fact that you eat simple carbs in the Paleo diet means that you can’t go into ketosis. This means that you do not gоиng to be really efficient at using fats as a fuel source. This brings us back to carbs, and a way to modify the Paleo approach to suit grappling needs.

There is one modification of the Paleo diet, called the Primal diet. Apart from fruits and vegetables, it also includes some starchy carbs. In terms of Paleo compatibility, grains are still o on the list. In terms of differences, root vegetables like potatoes, sweet potatoes and yams are back on the menu. These are starchy carbs that are essential for keeping up with the demands of everyday life while also rolling in BJJ.

If you are eating a nutritionally unbalanced diet, switching to a diet like Paleo is going to do wonders for you. Body composition, energy, health in general and easier weight cut are just some of the benefits for grapplers. What you are certain to get is a more balanced ratio of proteins, fats, carbs, and micronutrients while also cutting out most of the chemical junk. You ’ll feel better and look better over the long run, that is guaranteed.

Like any dietary approach, though, there is quite a bit of effort involved in maintaining it. And Paleo is a very strict diet indeed — you can pretty much forget about meals-0n-the-go and you better damn well learn how to cook.

Performance Nutrition For Grapplers: 2 Things Everyone Gets Wrong

Top Foods To Help With Fat Loss For BJJ

Rousimar Palhares KO’d in 58 Seconds After Going for a Leg Lock

Rousimar Palhares was going for a leg lock and got brutally knocked out by his opponent Aliaskhab Khiuriev.

As soon as the match started Rousimar was dropped down with a high kick from Aliaskhab. From that moment he was fishing for a leg lock, but Khuiriev never stopped punching him.

At one moment Rousimar Palhares managed to entangled Khuriev’s leg but without success. Khiuruev just turned and continued punching Palhares. That was enough for Palhares to let go of the leg and start to defend.

After Palhares got so many blows to the head referee was forced to stop the fight.

It was a very tough night for Former UFC fighter Rousimar Palhares at Fight Nights Global 85 in Moscow, Russia.

https://twitter.com/Grabaka_Hitman/status/979812196275380224

Dealing With Jiu-Jitsu Injuries: Elbow Joint Hyperextension

Jiu-JItsu INjuries Elbow Hyperextension

No matter which sport you’re involved in, the potential for injuries is there. Every sport brings unique injury risks to the table, depending on the environment it takes place in. With combat sports, the potential for injuries is even more pronounced. Combat sports result in injuries at quite a high rate both when training and in competition. And grappling martial arts hold the title for the highest rate of injuries among combat sports. It is the nature of Brazilian Jiu-Jitsu and other grappling arts, where people are in constant contact while changing the planes where the action takes place. Add to that the goal of controlling and ultimately submitting an unwilling opponent and you’ve got a recipe for disaster. While Jiu-Jitsu injuries are very common, some are specific to the sport as wearing a Gi is. One of those injuries is hyperextension of the elbow joint.

The elbow joint is not a particularly strong joint. Its anatomical position puts it in a position to be a frequent subject of Jiu-Jitsu injuries. As such it is not only submissions that put the elbow at risk. Of course, armbar attempts, especially belly-down, are the top contender for causing an elbow injury in grappling. However, Jiu-Jitsu injuries to the elbow can occur in many situations that arise, from takedowns to transitions and positional battles. As such, re-injuring an elbow can result in a significant time off from training or even the risk of a chronic ailment. This is just one of the reasons why Jiu-Jitsu injuries need to be taken seriously and treated properly.

Preventing Hyperextension Jiu-Jitsu Injuries

Some of the most common Jiu-Jitsu injuries are “joint hyperextensions”. This type of injury occurs when a joint, in our case an elbow, is pushed beyond its normal range of motion. Since a key principle of Jiu-Jitsu is to attack the weak points in the body, this joint usually receives a lot of attention.

In Brazilian Jiu-Jitsu joint manipulations are constantly the subject of classes. Factors such as experience, movement, and/or improper technique can cause injuries to you or your training partner. Injuries are a fact of Jiu-Jitsu life. After all, the more you sweat in practice, the less you bleed in combat. At least in theory.

First and foremost, never go all out on your partner right from the beginning. Grapplers need to work in a spirit of cooperation in order to keep each other safe. Staying injury-free in a sport that is based on joint destruction has to be the focus. Keep your ego in check and never try to show your stuff on someone who is willingly rolling or drilling with you. It is not only dangerous but it goes against the character of grappling in essence.

Jiu-JItsu INjuries

Dealing With A Hyperextended Elbow

Now, having said that, accidents do happen. Often, when an elbow is stressed, tendons begin to stretch. If pushed harder, they begin to tear. When an elbow joint tears, all you’ll hear is some “popping sounds”, very similar to when you crack your knuckles. Your partner, on the other hand,  might not feel something is wrong immediately. This is because tendons are very weakly innervated and pain perception is low in these areas.

However, within a minute or so, when the arm is back to its normal range of motion, you’ll notice changes. Primarily, there’ll be an apparent lack of movement followed by weakness and a “dull ache”. This dull pain gets more pronounced and worse as time goes by.

When this inevitably happens to you, ice the spot immediately for 10 minutes. The cold will cause the swelling to go down. Next, you’ll want to keep it immobilized. Over-the-counter painkillers (the likes of Ibuprofen) will definitely help. Keep in mind, however, that painkillers help with the pain, not the injury itself.

Do not be tempted to go straight back to training after downing a pill or two or you’ll just exaggerate the problem. If the elbow is tweaked or torn, you’ll need to lay off the Jiu-Jitsu for a while. Depending on the severity of the injury, this could mean up to a month off. While this can seem like an eternity you need to let the body start to heal itself.

Another great supplement for joint problems is something called glucosamine. Glucosamine is a precursor for glycosaminoglycans, which are the building blocks of joint cartilage. Supplemental glucosamine may help to rebuild cartilage, treat arthritis, or aid in joint repair. It can be bought virtually anywhere.

Jiu-JItsu Injuries Hydrotherapy

An Alternative Approach To Healing

Another remedy, this one of a more natural kind is called hydrotherapy. Hydrotherapy uses ice as the main tool for repair. And no, you won’t need to visit a specialist. You can do it yourself in the comfort of home. What you’ll need are Dixie cups, water, a topical painkiller, a dish towel, and some cling wrap.

Take some Dixie cups and fill them with water. Place them in the freezer and let them freeze. Take a Dixie cup out of the freezer and tear about 25% of the cup so the ice is exposed. Rub the cup over the injured area until the ice melts down. Next, use your thumb to push and massage the injured area. You need to really dig deep, pushing hard in order to relieve the pain. After a few minutes place some topical painkiller on the site. Repeat the procedure daily, for the duration of a week.

At night, wet a dish towel and place it in the freezer. Before you turn in for the day, wrap the frozen towel around your elbow.  Proceed to wrap cling wrap around the towel, so it stays in place during the night. Your arm will go numb after about 5 minutes. Expect to wake up a few hours later and feeling like your elbow is on fire. This is because the body has been rushing blood to the affected area in order to warm it up.

Best Methods OF taping Your Injured Fingers: https://bjj-world.com/best-bjj-finger-tape/

There is a perfectly sound explanation behind this method. The body’s best defense against injuries is to flush the area with blood. The cold/hot hydrotherapy speeds up and maximizes the body’s natural healing system. It is a proven way of getting your Jiu-Jitsu injuries to heal up faster.

Coming back to training after an elbow injury

Even after you come back to training you have to be pretty careful with your elbow joint and you have to make sure that you’ll do every precaution measure that needs to be done. Make sure you buy a tight elbow compression sleeve or compressions sleeve with pads like Elbow protection pads. This way you’ll make sure your arm is more secured from sudden blows or unwanted extension that could hurt your elbow even more.

Cauliflower Ear in BJJ: How to Avoid, Drain and Heal It

The Few Joint Supplements For BJJ Worth Your Time

John Danaher’s Ashi Garami System Of Leg Locks

Ashi Garami Danaher Leg Lock System

Ever since EBI hit the ground running, the world of Brazilian Jiu-Jitsu underwent a major change. For one, the No-Gi scene started really taking off. Furthermore, a new and, in my opinion, improved ruleset got to see the light of day. However, nothing got more attention the apparent lack of leg lock knowledge among the competing grapplers. Renzo Gracie Academy coach John Danaher showcased his Jiu-Jitsu brilliance with the help of his top students. For me, it was that iconic Gary Tonon vs. Eddie Cummings match at EBI 3. The pair of teammates went respectfully, but aggressively, at each other, relentlessly hunting submissions along the way. It was then and there that I realized that I had absolutely no knowledge of what these people were doing. Hence, my interest in their Ashi Garami leg lock system was born.

My discovery of leg locks closely coincided with a very powerful message I got from a black belt I respect very much. I was a blue belt, nearing purple, at the time. What he told me was to “invest in the legs”. By that, he meant start learning leg locks then and there, not waiting until brown or black belt. It is one of the best pieces of advice I ever got in regards to Jiu-Jitsu. That is when I started digging into the John Danaher leg lock system and discovered the term Ashi Garami. Now, Mr. Danaher guards his secrets really closely, but he does leave the occasional hint or two. Those breadcrumbs were enough to get me going and here I am, almost 4 years later, explaining the Ashi Garami concept myself.

How The Danaher Leg Lock System Influenced Grappling: https://bjj-world.com/john-danaher-leg-lock-system/

Positional Nuances Of The Ashi Garami

The Ashi Garami position originates in Judo. While it is not par to of the modern Judo game, it was included in the early Judo techniques. John Danaher’s Ashi Garami concepts are based on the original Judo position but have since evolved very much. The idea behind the Ashi Garami position is control of every joint of an opponent’s leg with the help of your entire body. Despite using your entire body, your legs play a crucial role in controlling the position. Imagine a single leg X-guard. Now take the standing opponent to the ground and you’re almost in the Ashi Garami.

The 9 Best Leg Lock DVD Instructionals For Grapplers

Control of the hip stems from the foot of one of your legs and the shin pressure across the opponent’s thigh, from your other leg. The knee is under the control of your own hips, while the ankle joint is controlled by your grips.

Before we look at how you can set up the Ashi Garami, we have to clear up nomenclature. Ashi Garami means “leg entanglement” in Japanese. That means that every position that results in an entanglement of your own legs with those of the opponent can be considered as Ashi Garami.

This is where variations come into play. In terms of your own legs, you can control with your feet open (the standard version). You could also have your legs triangle around one of your opponent’s legs. The triangle can be on the Inside or Outside of the leg you’re attacking. In terms of the position of the leg you’re attacking in regards to your body, there are three options. The leg can either be on the Bottom, on the Top, or across your torso (Cross). All of these positions, along with the inside/outside triangle make for different variations of the Ashi Garami.

Entries Into The Position of Ashi Garami

The beautiful thing about the Ashi Garami position is that you can enter it from a multitude of positions. However, since you need to be lying on the ground in order to be effective, this contradicts a common Jiu-Jitsu principle. If you have top position, it is generally considered unwise to give it up a lie down for a leg lock. Despite this common approach, very effective entries from the top do exist.

The primary entry position is the single leg X-guard. It is structurally very similar to the Ashi Garami itself, meaning not much adjustment is needed. When you think about the numerous entry options into the single leg X- guard, you a system emerges. Namely, you can enter the single leg X-Guard from butterfly guard, X-Guard, closed guard. Spider guard etc. This means that virtually every guard position can lead into the Single leg X, and conversely, into the Ashi Garami. The most common way to enter into Ashi from the single leg is via the basic twisting sweep.

From top position, whenever you think “F** it, I’ll go for a leg lock” at least do so technically. What I mean by that is instead of wildly diving into submission attempts, go for a strong position first. The De La Riva guard is a perfect example. When your partner has you in a De La Riva, one of their legs is already exposed – the one on your hip. Just make sure you break the grip on the other leg first, place your foot on their hip (on the side you’reattacking) and trap the ankle. It’s smooth sailing from there, right into a very tight Ashi Grami that you can bail out of straight back to the top very easily if needed.

Ashi Garami Anke lock(s)

The straight ankle lock from the standard Ashi Garami position is a legal option across all competition formats and belt levels. As such, it needs to be the one you know best. Finishing an ankle lock requires both extension of the foot, as well as torsion. This double attack provides the most mechanical pressure on the joint, eventually causing a break in structure. The basic ankle lock from the standard Ashi is the first leg lock you need to learn.

Mechanically speaking, the ankle lock can cause a tap in three distinct ways. You could put two-way pressure on the ankle via the aforementioned extension and torsion movements. You could also pressure the Achilles tendon by digging in with your wrist. Another option is going for a footlock, where you just do a maximal extension with the help of your armpit and upper arm.

Positionally, you can hit the ankle lock from most Ashi Garami variations. Both the bottom, top and cross variations of the standard and outside triangled Ashi offer excellent ankle locking opportunities. The inside triangle only offers a solid ankle lock from the bottom position. In the top (AKA game over) and cross (AKA 4/11) variation, ankle lock attacks are possible, yet not the first choice of submission.

Ashi Garami Toe Hold Attacks

The toe hold submission is also one that is legal in most competition formats, albeit from brown belt onwards. It involves a very pronounced twist of the foot, using torsion as the main pattern. A figure four grip configuration of the arms (think Kimura) is essential for pulling off a toe hold. While there are more proponents of the “take the foot to the butt” concept, I personally like extending the leg slightly when going for the toe hold. When you have a tight Ashi Garami on, extending the leg is only going to make everything tighter and put the submission on much quicker. Caio Terra is a great example of this manner of toe hold execution.

From a positional standpoint, the toe hold generally requires a top side Ashi Garami variation. This is due to the space that is required to crunch up in order for the figure 4 grip. Cross positions like the cross outside Ashi (AKA 50/50) and the Cross Inside Ashi are also appropriate. However, topside standard Ashi and Top Side Inside/Outside Ashi are the preferred positions for attacking with toe holds.

Ashi Garami Kneebars

The kneebar is the analog of the armbar in terms of lower body limb submissions. Mechanically, it puts the knee joint under enormous pressure via hyperextension in the opposite direction of the natural knee bend. The idea is getting your hips on the front of the opponent’s knee and control their foot, pointing the fingers toward your back. From there on it is much like the armbar.

From the Ashi Garami, the kneebar is not readily available, except maybe from the Cross Inside variation. It is, however, right there when you start transitioning between Ashi Garami variations. For example, going from the Bottom Outside Ashi into the Cross Inside Ashi Garami can be done by spinning around the opponent’s leg. Halfway between the two, there is a position we can refer to as the Rear Ashi. This is the sweet spot for the kneebar submission. The best thing about it is that if the kneebar fails, for some reason or another, you can always stay in control and transition further up or down the ladder.

A Study Of The Inverted Heel Hook From The 4/11 Position: https://bjj-world.com/inverted-heel-hook-from-the-4-11/

Ashi Garami Heel Hooks

When we talk about submission from the Ashi Garami, Heel hooks reign supreme. They’re illegal in many competition formats, even at black belt level. Deemed one of the most dangerous submission in  Brazilian Jiu-Jitsu they are extremely effective, albeit “slightly” vilified.

The heel hook is twisting submission that transfers force via a lever from the foot to the fine structures of the knee. it has an outside and inside (or reverse) variation depending on the side of the foot that’s near your body. The inside heel hook is way more devastating and is the one people usually look for in competition. Finishing the heel hook requires you to trap the fingers of the foot in your armpit while placing the heel on a “shelf” you create with your wrist. Different grips ensure varying degrees of finishing rate and potential damage to the knee and ankle.

The heel hook is available from all Ashi Garami variations. The positional advantage here is due to the type of heel hook available from the position, as opposed to the structure of the positional variation itself. The Cross Inside, Cross Outside and Standard Cross Ashi Garami offer access to the inside heel hook, which is the preferred option. All other variations lead to an outside heel hook, which is also a very viable submission.

Effective Attacks From The BJJ Truck Position

BJJ Truck Twister

Eddie Bravo is an enigmatic character in the world of grappling. When it comes to his 10th Planet System, people usually react in a black or white manner. They either love it to the core or can’t stand it. There’s usually no middle ground. There are plenty of reasons for this behavior that stems from the fact that this system tends to be different from “traditional” BJJ. After Bravo beat Royler Gracie most of the Gracie family got mad at him. His unique approach to Jiu-Jitsu, including renaming lots of moves and completely ditching the Gi did not help his cause. Well, at least during his beginnings. Today, the 10th Planet Jiu-Jitsu system is a well-established one with associated gyms across the globe. The system seems to be extremely effective, especially in the areas that define it. One such innovative position is the BJJ truck, a 10th Planet classic.

The BJJ truck is not a new position in terms of grappling martial arts. It has its origins in wrestling, as do many of Eddie Bravo’s concepts. However, it is optimized for Brazilian Jiu-Jitsu and is one of the most potent attacking positions in the modern era of the sport. 10th Planet standouts like ADCC competitor and EBI champion Geo Martinez have specialized in the BJJ truck to a level of perfection. There are even instances in MMA where the position has proven more than useful. However, it remains one of those positions that are hardly on the regular curriculum of most Jiu-Jitsu academies. While certain people outside the 10th Planet system do experiment with it, the BJJ truck has yet to conquer the grappling world in its entirety.

A Look At The 10th PLanet Jiu-Jitsu System: https://bjj-world.com/top-10th-planet-jiu-jitsu-innovative-grappling-concepts-bravo-inside/

The Beginnings Of The Truck

Eddie Bravo used to be a wrestler before discovering the Gentle Art. Under the tutelage of the great Jean-Jacques Machado, Bravo developed his unique style by adding forgotten wrestling techniques to his evolving Jiu-Jitsu game. The wrestler’s guillotine, today known as the Twister among 10th Planet practitioners, was one of them. This position ultimately gave birth to the BJJ truck.

The truck is essentially a modification of the leg ride from wrestling. The leg ride is a move that was originally intended to open up defensive opponents in order to get a pin. As such, the Twister and Banana Split techniques were pinning position first and foremost. Leg rides were used to open up turtled up opponents and later pin them with one of these two positions. Leg riding provides wrestlers with great control, allowing them to mount immense pressure on the opponent while hunting for the pin.

The crucial concept behind the effectiveness of the leg ride, and conversely, the truck, is the figure four configuration of the legs. Locking in figure 4 allows for a grappler to control one of their opponent’s legs completely. From there, in terms of wrestling, it is all about pinning the opponent. The benefit of reducing the opponent’s possibility for movement is crucial in term of submission hunting as well. The BJJ truck allows submission grapplers to submit to the common wrestling positions. Eddie Bravo took this concept even further, perfecting the position for Jiu-Jitsu.

A Positional Study OF The BJJ Truck

The BJJ truck position can be considered a variation of back control. The advantage of this position is that it is kind of halfway between complete back control and mount. As such it offers easy transition back and forth between two of Jiu-Jitsu’s most dominant positions. Eddie Bravo is in the habit of calling these positions “dead zones” which I find to be a very fitting description. He has a few more apart from the back, the mount and the truck, but we’ll look at them in a different article.

Apart from being the perfect transitional checkpoint, the BJJ truck is a “dead zone” by itself. The control in the truck position comes from the figure 4 on one of the opponent’s legs that provides total control over their hip on that side. Since one anchor point is never enough for control in Brazilian Jiu-Jitsu, there are two ways of obtaining more of them. One is by controlling the opponent’s opposite side leg, thus rendering their hips motionless. The leg is easiest to control via the foot, but a banana split is also a great option.

Alternatively, control can be gained over an opponent’s shoulder, which is, in my opinion, better. The reason for this is that the shoulder you’re looking to control is the one placed diagonally of the hip you already control. This cross-body control (which is the secret behind the wrestling pin) allows for efficient immobilization of the opponent. The leg configuration can switch between the figure four and “lotus” position, depending on the situation. Both control positions are easily interchangeable, each opening different venues of attack and transitional opportunities.

Brutally Effective Truck Attacks

From the BJJ truck position, depending on the type of control, there are two main attacking areas. When in control of both hips, leg locks are the way to go. In cases of cross body control, via the arm, it’s all about the twister and similar spinal locks. The back is attainable from both controlling positions, as is the truck in a vice versa manner. You could also go for the mount if all else fails, but I think that the back is a better option. For those more creative, there are also ways of getting into the 4/11.

Leg Attacks From The Truck

The most readily available leg lock from the truck is a calf slicer. This brutal submission is usually hard to get because opponents tend to wiggle out. The truck position offers the best control for finishing the slicer submission. The figure four configuration is actually just a tiny adjustment away from a full-blown calf slicing position.

When in the BJJ truck, it is essential that you control both legs of your opponent. When looking to finish with a calf slicer, this is even more important. For the submission, you’ll need to bend the leg you control via a figure four at the knee. While you do this, the aim is to place your shin as deep as possible behind their knee. The truck itself allows for a very deep placement of the leg.

Letting go of the opposite side leg at this point is most likely going to result with the opponent spinning out, leaving you on the bottom of half guard. So, you should either look to control the foot of their free leg or tuck it under your armpit. This will give you the control you need to reach for the foot of the leg you’re attacking and pull towards your chest while pushing away with the hips. Another key tip is not placing your free leg directly on your foot for the calf slicer. This can allow the opponent to look for an inverted heel hook on your leg. This is easily avoidable though, by using a triangle to keep your legs in place instead of pushing down on your foot.

Get The Calf Slicer From Everywhere: https://bjj-world.com/calf-slicer-underestimated-submission/

Another submission option is the banana split. All it takes is hugging your opponent’s near side thigh and pulling towards yourself while extending your legs.

The Twister

The twister is a spinal lock that is a modification of the “wrestler’s guillotine” pin. The idea is to twist the spin of your opponent, placing immense pressure that results in a tap or very serious injury.

For the Twister, you need control over the arm that’s on the opposite side of the leg you’re controlling in the truck. The best approach is controlling the wrist with both of your arms. Once you have the wrist, push your near side elbow deep into their armpit. This is the “baseball bat position” which is essential for completing the Twister.

Entry into a perfect position for the submission involves you getting the arm you’re controlling up and around your head. Essentially, you want your head to come through the opponent’s armpit while keeping their arm behind your back. From there, all it takes is placing a grip with both your arms on the side of the opponent’s forehead and pulling back. Be careful with this submission as it comes to really fast and can cause very serious injuries!

Quick Jiu-Jitsu Conditioning Workouts For Busy People

Jiu-Jitsu Conditioning Quick Workouts

Brazilian Jiu-Jitsu is a difficult, difficult martial art. It has no end. Hundreds of complicated techniques with weird names and an endless system of concepts and principles. As if all of this wasn’t enough, grappling martial arts are also extremely demanding on the body. AS far as full-body conditioning goes, hardly any sport involves everything in the way Jiu-Jitsu does. Muscles you had no idea were there get a workout they can’t normally get by conventional fitness means. Not only that but you also develop stamina and endurance while throwing other people around. However, once you adapt to the basic grappling exertions, attaining top-level Jiu-Jitsu conditioning is going to require more work. Just grappling is not enough to take you further into elite athlete territory. This is what many people come to struggle with.

So, in order to improve your overall conditioning for Brazilian Jiu-Jitsu, you need to develop multiple athletic qualities. For grappling, you need isometric strength, explosive strength, agility, flexibility, grip strength, endurance, etc. Now imagine having to train each of these qualities independently, on top of training Jiu-Jitsu. Even a professional athlete would have trouble adhering to such a schedule. For the everyday Joe, this is simply impossible. Luckily, there are options out there to make even the busiest grapplers better while not taking up much of their time. The only rule of thumb to remember is to keep getting the hours on the mats in. That’s where shortcuts don’t work.

A Quick Conditioning Fix

When looking to improve Jiu-Jitsu conditioning while juggling dozens of everyday tasks, the emphasis must be on efficiency. Not all training methods are created equal and you should youse this to your advantage. You need to look for the methods that allow for the development of multiple qualities at the same time. While many fitness experts claim that this is not possible, the evidence points to the contrary. At least in terms of grappling martial arts.

For grappling specific strength and conditioning, it doesn’t take powerlifter strength, marathon running endurance, and bodybuilder-like physique. Just like it doesn’t take a deep knowledge of grappling for MMA. You only need what you can successfully use. In those terms, workouts should be designed around your needs and time constraints. A few other factors also have to be taken into account.

Namely, before you choose your basic tools, you need to ask yourself a few questions. Whether it is based on accessibility or personal preference, you should devise your conditioning plan based on the answers to those questions. For starters, how large is the initial investment? Will there be an ongoing cost or maintenance fee associated with the piece(s) of equipment you’ve chosen? Also equipment-wise, it is important to consider the size of the equipment? Does it take up much space or can it be stored easily? In this sense, think a couple of kettlebells vs a squat rack with all associated pieces of iron.

Another major aspect is portability. Since many folks travel for work, conditioning tools should be easily portable in order to have constant access to them.  Can you travel easily with the training tool of your choice? It is also of note to be aware of how long this training tool will last.

Grappling Specific Conditioning

One great way of getting match-fit is the Marcelo Garcia approach.  According to him, all it takes to get better at Jiu-Jitsu is training Jiu-Jitsu. This, however, doesn’t mean just doubling your time on the mat. It means upping the intensity of rolling so that you gain increased benefits. Also, consider looking for stronger and/or larger partners. No matter how technical you are, it’ll take more effort to deal with someone 30 lbs heavier than you.

The only reason why someone else’s body isn’t your best bet is that you may not always have access to a training partner. Not only a training partner, but you’ll also need access to a gym with mats. If you’re looking to put in an extra Jiu-Jitsu session based on more rolling, you may encounter difficulties.

Since Jiu-Jitsu is a grappling sport it’s a great idea to actually apply force against another body. Partner training doesn’t have to be limited to sparring though. While drilling and sparring are excellent options, partner calisthenics is also an effective method for getting into grappling shape. The exercise options are limitless, resisted pull-ups, monkey boys, resisted partner push-ups etc… Use your imagination and match your training to the demands of Jiu-Jitsu for ultimate results.

Bodyweight Jiu-Jitsu Conditioning

The one and only best JIu-Jitsu conditioning tool is your own body. Without a doubt, nothing trains your body better than your body. It’s always there; It is highly portable and easy to travel with. It’s already paid for and the exercise possibilities are incredibly immense.

You can crawl, climb, run, jump, do solo BJJ drills, shadow wrestle…you name it. If you can imagine it, you can do it. Do we even need to speak about its lifetime value? Hopefully, you’ll have it for a long, long time and if you treat it right you will. Bodyweight conditioning is the primary source of conditioning for some of the all-time greats of grappling. For example, both Rickson and his son, Kron Gracie are huge fans of getting into shape with the help of your own body weight. Nobody can dispute their result, so why not do it yourself?

Kettlebell Circuits  For Grapplers

First, let’s make something clear. You do not need to own kettlebells per se. While having them is great, a pair of dumbbells will also do. In fact, they might even be more effective, since you can adjust the weight on most of them. Yes, they’re both included in the same number and yes, there are some distinct mechanical differences between these two training tools.  However, it’s not that big of a deal to have a separate category.

Dumbbells and kettlebells both rank high for all the chosen criteria. They’re both very versatile, can be taken almost anywhere, they don’t take up much space and you’ll be able to pass them onto your future generations quite easily. There are some vintage kettlebells and dumbbells for sale on eBay that are well over 100 years old.

Sure, they cost more than your body or a training partner (unless you plan on doing more than training) but it’s a one-time investment and their lifetime value makes up for their initial cost. moreover, you can get a brutal workout in as much as 20 minutes. These tools can efficiently improve every athletic quality a grappler needs.

Suspension Training

It could be a set of classic gymnastic rings, a TRX, or any suspension trainer available. There are many models and options to choose from currently and you can train just as effectively with them all.

The exercise options when using a suspension trainer are quite broad and versatile. It’s very easy to make adjustments in leverage and angles making each exercise either easier or more difficult depending on your needs. You should have no issues traveling with any suspension trainers. You can even pack them in your carry-on luggage without any glitches on both domestic and international flights. They don’t take up any floor space and can be taken down very easily and stored quickly.

Some suspension trainers are a bit on the pricey side. Make sure you investigate each option and match it with the type of training you have in mind. You may not need all the bells and whistles that come with some units.

Sandbag Jiu-Jitsu Conditioning

An old-school grappling conditioning tool is the sandbag. In all honesty, it would probably have ranked higher on this list if not for the fact that once you’ve built a nice sandbag it’s hard to travel with. You’ll be able to fit it into your trunk, no problem, but it is a pain. However, you shouldn’t let that stop you from using sandbag training for your Jiu-Jitsu conditioning.

Outside of your own body and the body of a resisting training partner, sandbags are the next best thing. Sandbags develop great grip and isometric strength. They’re excellent for performing loaded carries and walks and they’re generally very tough and durable. There are several commercial sandbag options available. To be honest, it’s very easy to make one yourself, using an old seabag and some duct tape.

Use Gymnastics To Become Freakishly Strong For BJJ

Bear Crawl Yourself Into Shape For Brazilian Jiu Jitsu

Rules Of Thumb For Visiting A Foreign Jiu-JItsu Academy

Jiu-Jitsu Academy Guest

The fact that Brazilian Jiu-Jitsu is a worldwide phenomenon, makes training it that more fun. While everyone enjoys training at their resident Jiu-Jitsu academy, people do tend to grow accustomed to their training partners. This is particularly true in the case of smaller schools, where training partners completely know each other’s game after years of training together. While local rivalries usually prevent people from training over at other nearby schools, there’s no problem with training outside the boundaries of your city or country. The global character of Jiu-Jitsu means that people from other cities/countries are eventually going to end up in your school, adding a bit of variety to every day grappling. More importantly, everywhere you go, whether it is for work, vacation or specifically to train, you can visit a Jiu-Jitsu academy. Most schools are very open to guest grapplers jumping in for a training session or two.

Whenever you are traveling, make it a habit to include some research on the local Jiu-Jitsu scene during the planning phase of your travels. A visit to a Jiu-Jitsu academy in another country can be a very pleasant experience. The beauty of Brazilian Jiu-Jitsu is that it is so widespread around the globe that you can easily find out how many clubs there are and which ones might best suit your needs. However, there are some factors you need to consider when selecting a school to visit. You should have clear criteria as to what you’re looking for and be aware of “rules for Jiu-Jitsu visitors”.

Academy Selection Criteria

One great way to locate Jiu-Jitsu academies around the globe is to post a question on Facebook. Maybe a friend will be able to refer you or knows someone else who can. Facebook groups can connect you to grapplers all around the world. If that doesn’t lead you to any answers, you can try a Google search or post the question on Sherdog or Reddit. For the simplest option, just type Brazilian Jiu-Jitsu and the spot you’re visiting on Google. You can go into more extensive research based on those results.

Once you’ve narrowed down a few options, you can read reviews for the clubs on YELP and look up their websites.  It is also preferable that you contact them to find out about schedules and pricing. It’s always better to confirm the details before showing up to a club, just in case operations have changed, but the website hasn’t.

Each Brazilian Jiu-Jitsu Academy is different and when you visit a new one, it’s best to adapt to their system for the duration of your stay. For example, do they clap when breaking away from the instructor to learn technique? Do they bow before stepping on or off the mats? Can students ask higher-ranked belts to roll or do they wait to be asked? How do they begin a match? How do they line up after class? Do they have any club rules? Is there a particular Gi color required?

Jiu-JItsu Academy Visitor

A Few Rules OF Thumb For Visitors

Sometimes you can figure out the answers to the above questions just by looking at photo galleries on a club’s website. Some schools even have their rules posted online. The following rules of thumb are usually in effect in every academy in the world. As a visitor, you need to make sure you adhere to them.

Showing up a little early is always advisable. In the case of schools that have paperwork included, this gives you enough time to take care of it. While there, make sure you ask the instructor if any submissions are prohibited. Plenty of Gi only academies frown upon certain leg locks and neck cranks, even in training.

During class, do not speak or interrupt the instructor as he or she is teaching. You should already know this one, as it is a cardinal rule of martial arts. Not using foul language is another given one. If you plan on going a Jiu-Jitsu academy more than once, bring enough Gis to ensure you have a clean one for each class. Alternatively, find out where you can wash your Gi between classes. Have a Gi that is free of rips or tears. As far as hygiene goes, all the basics apply here. Ensure you have fresh breath and no body odor. Wear deodorant and have your fingernails and toenails trimmed. Also, make it a point to remove all transferable cosmetics and jewelry.

During training, do not be overly aggressive when rolling with other students and do not wait too long to tap. After all, you’re visiting, and as such might be a “prize” for the young guns. Also, do not forget to pack a mouth guard and wear it while rolling.

Remember The Unwritten Rules Of Jiu-Jitsu And You Can’t Go Wrong: https://bjj-world.com/unwritten-bjj-rules/

Jiu-JItsu Academy Visiting Rules

Rolling In A New Jiu-JItsu Academy

A good approach to rolling with people you don’t know, especially during a visit to a foreign academy, is to roll cautiously. Big white belts should be on your “do not roll” list due to the high likeliness of you getting hurt as a result of clumsiness, aggression, or unknown tactics. We’ve all missed time on the mats because of various injuries so staying healthy is a priority for everyone involved in BJJ. Although it can feel bad to say no to rolls, it’s gonna keep you safe and ultimately that’s what matters.

Remember when you do roll, your partner will reflect your intensity. If you come on hard and fast, your partner may do the same. If you ease into the roll, your partner will usually do so, as well. Once you get a feel for your new rolling partner, you may be able to have a normal roll, but a feeling-out process is highly recommended.

Also, it’s not a tournament. It’s just a class. If you find your BJJ is at a higher level than your partner, it’s probably not polite to tap him or her seven times in five minutes. It’s kinder to allow the person to work on their game, too. Remember: you’re not only representing yourself – you’re also representing your team and your home academy. It’s best to not be an asshole, if possible. If you’re the one getting tapped seven times in five minutes, it sucks – but hey, it was only five minutes out of your life. And hopefully, you learned a thing or two.

Do Not Be An Annoying Rolling Partner: https://bjj-world.com/bjj-training-partner/

Just do your homework before picking a club, mind your manners and their rules, and you’ll do just fine.

Brazilian Jiu-Jitsu Concepts Explained: The Tripod Principle

Jiu-Jitsu Concepts Tripod Principle

The martial art of Brazilian Jiu-Jitsu becomes a more complex puzzle the more you study it. Contrary to the popular expectation that you are going to learn it better the more time you spend doing it, Jiu-Jitsu just offers more complicated mazes. Don’t get me wrong, you will understand it better, you might even turn out to be a world-class competitor. But it is hard to imagine anyone fully grasping the essence of the Gentle Art. It all starts with techniques, which are simply motion patterns that can easily be mastered. Next, it is all about connecting them in a working system, creating an individual game for yourself. However, once you have sufficient technical mastery, Jiu-Jitsu takes a surprising turn. Suddenly it’s not about strategy and tactics anymore. Jiu-Jitsu concepts start to take over where techniques left off. This is where the abyss of Brazilian Jiu-Jitsu truly opens up.

In a series of future articles, we’re going to attempt to clarify as much of the Brazilian Jiu-Jitsu concepts as we can. Of course, feel free to throw in your experiences and opinions on the subject, so that we can all come to understand our art just a little bit better. To start things off, I’m going to lay out a founding principle that has massively influenced my game. It is one of those crucial Jiu-Jitsu concepts that open up areas of the art that are so obvious that most people miss them. let’s talk about the Tripod principle of Jiu-Jitsu.

Learning Jiu-Jitsu Concepts

Jiu-Jitsu concepts are not hard to understand in theory. When it comes to practicing them, things get a bit trickier. Do you know how every time you look to practice a new technique during rolling, you have to stop and think about it instead of flowing? Well, with Jiu-Jitsu concepts it gets even more complicated. When you add in a technique, let’s say a mounted armbar, you start thinking only form the mount. While in other positions during rolling, you’re going to go with your usual flow.

However, concepts apply to every part of grappling martial arts. As such, you’ll suddenly seem worse off when you first attempt to integrate a concept into your game. That is why the conceptual game is much better suited for advanced students (purple belts and above). So, whenever you include a new concept into your game do not be afraid to take it slowly. It is going to take much more time to get comfortable with a Jiu-Jitsu concept than with a technique, especially when going live.

The Tripod Principle Of Jiu-Jitsu

As far as the Tripod principle goes, it is very simple in theory. Jiu-Jitsu, much like a tripod stool, is based on three main pillars. These pillars are base, posture, and structure. Staying in line with our tripod stool analogy, if you take away one of these foundational pillars, the structure’s stability is weakened. Take away another one and it can barely stay upright, if at all. if you take away all three, the tripod stool seizes to exist.

From an opposite perspective, you want to have all three foundational pillars for yourself. Before I go on I want to make something very clear. The Tripod principle applies to both the bottom and the top game. For that matter, it applies both standing and when on the ground. It is not limited to top positions only. So, wherever you find yourself positionally, you need to make sure you have all three foundational pillars of the tripod principle. In an ideal situation, you would have all three firmly in place, while taking all of them away from your opponent. Ideal situations, though, are in reality extremely rare in grappling.

A great approach to always staying ahead of your opponent is watching out for the score. Let’s say that you have all three pillar and your opponent has all three. The chess game here is taking all of his away while keeping all of yours. Since in reality, this is quite difficult to obtain, you need to at least make sure you lead the score. So while the ideal score is 3:0 for yourself (you have base posture and structure, your opponent has none), in real life it’s going to be 3:2, 3:1 or 2:1 way more often. A draw means you need to regain advantage before looking to dismantle your opponent.

Jiu-Jitsu Concepts Tripod

The Principle Of Base

First of the three pillars that make the Tripod principles is base. As far as Jiu-Jitsu concepts go, this is one that you learn during your first weeks of training. A strong base is a starting point for a successful game. Once again, the base is not just a top game concept. While clear base on the bottom is not always apparent, the opportunity to build one is. let me explain.

If you find yourself in side control, you’re going to need the power of your feet on the mats in order to go for an escape option. Even the most basic bridge and shrimp escape require at least one foot on the ground. That is base. Now imagine that your opponent has both your feet wrapped and off the ground. Escaping becomes much more difficult now.

From the top position, this concept is easier to grasp. A good base means good balance which in turn means you can start looking to take away one of your opponent’s pillars. Usually, when standing, a staggered stance translates to a better base than a parallel one. It’s one of the basic concepts of martial arts in general.

Taking base away from your opponent is usually the first thing people think off when they’re on the bottom. Every sweep or submission from the bottom requires a shift in weight, which means disrupting the opponent’s base. We’ already talked about an example of taking base away from an opponent that’s on the bottom. In both cases, taking away their base while retaining your results with a clear advantage for you. It sounds simple, but it gets complicated when you try it. Well, at least in the beginning.

Posture For The Win

Posture is also one of the foundational Jiu-Jitsu concepts you learn as a beginner. What most people fail to do is retain this information in the long run. Failure is a great teacher, and this soon gets rectified, although after numerous errors. Staying upright when attacking from the top is once again clear. As long you have correct posture there’s not much an opponent can do attack wise. Well, other than attacking your base.

JIu-Jitsu Concepts Tripod Princile

Before we look at how posture helps a grappler fighting of his/her back, let’s define the term first. Most people perceive posture as the prevention of a forward lean. While leaning to the front, back and sides do constitute a broken posture, so does twisting. Twisting one’s spine also breaks posture. This is an often overlooked concept in battles for posture. So, whether you’re on the top or bottom, keep your posture strong in order to dominate. This includes every plane of motion that the spine is capable of going through. Form the top, think about folding and opponent in half. From the bottom, think about a hip rewind. Both are great examples of completely broken posture.

The Pillar Of Structure

The structure is probably the most complicated pillar of the Tripod principle. Before we get lost in the maze that is structured, let’s dumb it down. In terms of Jiu-Jitsu concepts, the structure is defined by the placement of your body and limbs in regard to your opponent.

Let’s use top side control as an example. The concept of side control is to get your body across your opponent’s body. Holding side control requires correct weight distribution and precise angling of the body. Both of these aspects fall into the “structure” category. Furthermore, placing your arms in one of the few dominant positions from top side control completes the principle. From side control, a structural concept is placing your arms either on one side of your opponent’s body, or staggered across both. Every placement of the arms opens up different attacks while preventing different movements of the opponent. That is structure at work.

Now, when looking to shift the score to your advantage, the aim is to take their structure away with the help of your own structure. The structure is also the primary tool for taking away both base and posture. As such, it should be the one thing you safeguard most carefully during a roll or a match. That way, you’re at least be able to get o a 1:0 score, the minimal required for successful attacks. Simple yet complicated right?

Jiu-Jitsu Concepts Tripod

Now that you are aware of the Tripod principle you can expect two things. The first is that your rolls are going to become a lot less efficient before they improve. It takes time to consciously integrate the principle into your game, so be patient. Second, you can expect that whatever technique you choose to apply is going to work if you outscore your opponent by at least 1.

A Practical Blueprint for the Journey Through Brazilian Jiu-Jitsu

Submissions From Guard: The Holy Trinity

Specific Vs. Well Rounded Brazilian Jiu-Jitsu Game

Versatile Attacks From The BJJ North-South Position

BJJ North-South Attacks

The one position that always causes amusement among non-grappling people is the BJJ North-South position. As funny as it may seem to the untrained eye, this position os a very advantageous one for the top player. It is notoriously difficult to escape and is as uncomfortable as Jiu-Jitsu gets. It has been proven to work in the highest tiers of competition and is one of the top submission hunting positions from the top. The positions easily connectable with every side control variation, allowing for seamless transitioning between them. This in turn oftentimes opens up attacks while preventing escapes at the same time.

The basic notion behind the BJJ North-South position is control over your opponent by proxy of the head. The positioning from the Nort-South is such that your hips and legs, which are the strongest part of your body, come up against the opponent’s shoulder girdle. In addition, it is quite easy to control the hips from there, which completely immobilizes opponents. In an attacking sense, there are plenty of different submissions available from the position. Today we’re going to look at lots of chokes and a few arm locking options.

Controlling The BJJ North-South Position

This position is a variation of side control and you can easily move into this position if you’re in classic side control.  Usually, it’s easiest for the transition when your opponent tries to bring their legs underneath you. While the BJJ North-South position is considered distinct from side control, in terms of scoring, there is no difference. In the traditional IBJJF rules, just like side control, the position itself does not score any points. However, points come from the act of passing the guard. In the popular NAGA rules, in the No-Gi scoring system, North-South falls under the classification of a ‘side control variation’.

The BJJ North-South position is a very secure hold down to control a larger, stronger opponent. If you can secure your proper grips and apply your body weight, escape for your opponent is very difficult!

Now let’s take a look at some of the reasons a grappler might wish to transition to the North-South position from side control. One of the main advantages that the North-South position has over other side control variations is hip distance. In most side control variations, the top grappler’s hips are very close to the bottom grappler’s hips. Usually, the top grappler’s hips are used to help check and control the bottom grappler’s hips. This allows the bottom grappler to affect the top grappler’s base with powerful hip bridges. This is particularly true when there is a significant size disparity. Most grapplers have had the experience of having their side control painfully reversed by much larger opponent simply through greater strength and weight. This is not the case with the North-South.

Choking From The North-South

North-South chokes are very high-percentage submissions that a grappler can finish from the BJJ North-South position.

The North-South is a very stable position to control a fresh, strong, thrashing opponent. But once you have secured the position and controlled your opponent…what do you do next? The North-South choke may start in side control and get sunk in during the transition to North-South with various setups.

in Judo, North-South is known as “Kami Shio Gatame” or North-South mount. Judo has developed this position highly, as it is possible to win by holding/immobilizing the opponent for 25 seconds. Judo legend Katsuhiko Kashiwazaki was known for his groundwork and demonstrates many different fine details of the basic North-South choke:

The North-South Choke Instructionals

No one is better known for the North-South choke than MMA fighter and ADCC Champion Jeff Monson. Now Jeff Monson has some huge, muscular arms, but smaller guys can hit this choke as well. Big guns are not enough to get the choke, although it probably doesn’t hurt.

The question with the North-South choke is: How do you actually get into the submission position? Marcelo demonstrates his setup on how to get into the choke position. Marcelo also proves that one does not need Monson-esque arms to be effective with the choke!

Next, here’s a video that goes over three different finishing options for the North-South choke.  Often times grapplers will write off a move as “not for them” when in reality a simple variation is all that is necessary to make a technique work perfectly well for them. Try these variations and see which works best for you.

Lapel Based Chokes

The bead cutter or paper cutter choke is another common submission from the position. It can also be set up from the kimura attack by trapping their own arm with their own lapel or belt. It is a very potent choke that can leave an opponent sleeping in just seconds.

Here Are A Few More Gi Choking Options: https://bjj-world.com/unorthodox-gi-chokes/

North-South Armlocks

The north-south position is a Mecca for attacking chokes, as we already saw. This is mainly due to the fact that you have the neck of your opponent at your disposal while they’re lying flat on their back. In instances, however, in which the opponent attempts to reverse the position, they often end up tilting to one side. Once they get into such a position, the top side of their body is open for attacking armlocks of all kinds. And all the while you retain the high level of control the position offers.

A North-South Kimura 

The Kimura from North-South control might be the number attack you can look for from North-South position. Check out this tricky variation on the Kimura shoulder lock where you “Lion Kill” your arms to make the lock

An Armbar Followup

In the technique demonstrated below, you can see a perfect demonstration of sequencing and timing different moves. First, it’s the North-South choke and once the opponent defends, the next move is the armbar. It is pulled off at a very precise time that doesn’t give the opponent a chance to defend.

Wrist Locks For Sneaky Folkes

For all those small and technical people out on the mats that don’t rely on strength, wrist locks are a very useful attack. Since stronger opponents might decide to defend a North-South Kimura like they’re hanging off a cliff, it takes a lot of effort to pry the arm free. In such cases, going fro the weakest link in the chain is the best course of an attack. Although some people look down upon wrist locks for being sneaky and dishonorable, just remember that people hated on leg locks too. After the Danaher Death Squad, everyone is now desperately trying to catch up though. Who knows, you might end up pioneering this useful submission from the BJJ North-South position!

Everything You’ve Ever Wondered About Wrist Locks, Explained: https://bjj-world.com/wrist-locks-bjj-nobody-defened/

How To Stay Safe From Common BJJ Gym Bacteria

Safe From Gym bacteria

Brazilian Jiu-jitsu is an art that exposes the body to the maximum amount of microorganisms possible. Most sports either have limited contact between the surface of the body and the ground or spend a short time in a prone position. Constantly rolling around and grinding every imaginable (well, almost) body part on the ground is a Jiu-Jitsu trait by all means. Furthermore, the mats are a surface that can be a fertile ground for the growth of microorganisms. So are certain types of Gis. All in all, there are plenty of opportunities for grapplers to catch a nasty bug or two while training. In that sense, protecting ourselves from the most common gym bacteria is not complicated. It just takes some due diligence and basic hygiene.

What you have to understand is that you have basically three kinds of bacteria (and fungi as well) living on us. First are beneficial ones, than the ones that cause you to get sick, and finally, those that can cause you to get sick when given the chance. There’s this beautiful and important balance that occurs when one is healthy. When one is sick and the proportion of the latter two categories overwhelm the beneficial bacteria, then you have problems. So let’s explore the best strategies to keep common gym bacteria at bay.

Unwritten BJJ Rules Every Grappler Should Know: https://bjj-world.com/unwritten-bjj-rules/

Basic Personal Hygiene

Washing with plain old warm soap and water is the best thing you can do to stop the spread of disease. The mechanical action of washing your hands is the best way to get gym bacteria off of your body. Hand sanitizing using alcohol-based hand sanitizers is not a substitute for hand washing. It can, however, be used to supplement a hand-washing regimen. The germs a normal person might be exposed to on a daily basis don’t really require any fancy antimicrobial soaps.

Furthermore, how often you wash and what you wash with really does depend on certain factors. For people who are exposed to nasty bacteria on a daily basis, due to their profession, need to pay better attention. Stronger sanitizers are the way to go here. For the majority of the grapplers out there, they could probably do with using an alcohol-based hand sanitizer. The best time to use it is after rolling, in addition to washing their hands/showering.

As far as antimicrobial agents go there’s an issue with their constant use. You see, bacteria tend to be adaptable little critters. After all, they’ve managed to survive for millennia. Over usage of such products very often results in bacterial resistance.  The real problem with this is cross-resistance. This is when resistance to one antimicrobial also protects the bacteria from another unrelated antimicrobial. This is how common gym bacteria can turn into a really scary problem.

Jiu-Jitsu Gym bacteria Protection

Post Workout Hygiene 101

This is an interesting and really great question. Bacteria can absolutely live on bars of soap, especially ones that are frequently used for hand washing. Its recommended that bar soaps not be used in public places. there is, however, a study that showed there’s no evidence that “in-use” soap bars can transfer bacteria to naive hands.

So, to address the body wash issue. As long as the body wash container isn’t being refilled (which is common in gym environments) everything is fine. Refillable hand soaps/body washes have been shown to transfer bacteria and can become easily contaminated. So as long as it’s your personal bar of soap, and not a community one, you should be fine.

On warm, sweaty skin all bacteria would be able to multiply rather quickly This includes any bacteria one might have picked up from the mat or a grappling partner. It is best to take a shower as soon as you can after the session was over.

In a community shower, fungi and bacteria on the feet are the greatest concern. There are some methods, though, that can help. As long as you’re bringing in your own towels, soap, and shower shoes, the risk of taking home anything you don’t want would be minimized.

Keeping Your Gi Safe From Gym Bacteria

Bacteria are really good at clinging to things, especially S. aureus. It’s an undisputed champ. It is particularly good at clinging to natural fibers like cotton.

Your skin has an amazing abundance of bacteria that call it home. Acne and our sweat are at the top of their menu. That said, a sweaty cotton belt would be a perfect place for bacteria to set up shop. So if the goal is to encourage the growth of bacteria not washing a cotton belt is a great idea. In all other instances, please, throw it in the washer!

Moving on to Gis. After proper washing, by the time most things make it to the dryer, they’re no longer viable. Any vigorous mechanical agitation would definitely help in dislodging gym bacteria and other things from the fabric. As far as peroxide goes, the concentration you get in the drug store (usually 3%) isn’t nearly enough to make a difference. Bleach would definitely work, as long as the Gi is white. For a colored Gi, hand washing in warm water with detergent and air drying is a good way to keep everything clean.

Gym Hygiene And Bag Disinfection

When it comes to keeping the mats clean, most people overdo things. There’s no need for most fancy sanitizers that cost a small fortune every month. A diluted bleach solution works best here. Bleach kills just about everything. Just make sure to correctly figure out the dilution ratio. A 2:1 ratio is the best to kill gym bacteria but keep the mats safe from degradation. That’s two parts water to three parts bleach. If you’re feeling particularly paranoid, you could always go for a 3:1 ratio. Just make sure you thoroughly clean the mat area.

Gym Bacteria Hygiene

Keeping a clean gym bag would be a huge help in stopping the growth and spread of harmful bacteria. A cotton gym bag needs to be washed regularly, to begin with. In case of a vinyl one, spraying with Lysol or wiping it out with a dilute bleach solution, are more than enough.

In conclusion, the grossest thing is not washing a sweaty, cotton belt. Why wouldn’t you wash a sweaty, cotton belt? The other thing is having common sense. We have an immune system for a reason, and our own flora is part of what keeps us healthy. Wash your hands and your body regularly. For most people, antimicrobial products are unnecessary. Stay safe and keep the training area clean.