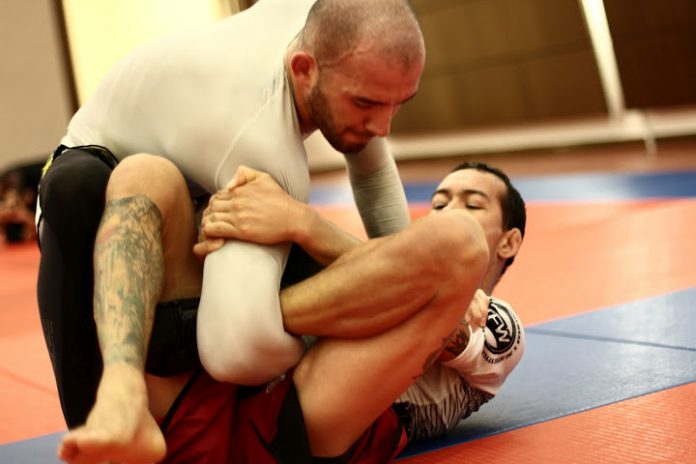
Slicers, whether they’re on the bicep or calf, are very nasty submission holds that are not completely legal in BJJ. Still, after achieving a certain level they become available and offer great variability in the attack. As such, people tend to use the calf slicer more nowadays, but the bicep slicer is still somewhat of an afterthought at best. Those that know it understands its potential, but for some reason, it doesn’t find its way into the arsenal of many top-level grapplers. The bicep slicer is one of those submissions that got forgotten for a bit, making it a prime candidate for a huge comeback! With today’s setups and mechanical details, you’ll be able to slap it on lighting fast and surprise everyone! Let’s start at slicing.
Submissions involving trauma to the muscles are not something we see often in Jiu-Jitsu. Granted, chokes are undisputed as the top submission option to have, regardless of which kind you like. Joint locks, follow suit, with twisting locks having the upper hand over straight locks. Finally, there are cranks and muscle compressions. The legality factor usually removes cranks from the equation, leaving us with compression locks, AKA slicers. The calf and bicep slicer are mighty weapons, particularly the latter. A bicep slicer is something that nobody expects and, if you put some training in, something that will work on just about anyone. Simple and painful, just how we like our submissions!
“Legal Disclaimer”
The bicep slicer submission, as a compression lock is subject to some specific competition rules. As such, it is legal under IBJJF/UAEJJF rules only after the rank of brown belt. Attacking with one intentionally before that is going to get you disqualified. Since IBJJF/UAEJJF rules are considered as the standard, it is widely accepted that you can’t do the bicep slicer until you’re a brown belt. This includes both Gi and No-Gi competition.
However, it is worth noting that under different rulesets, bicep slicers are usually legal. Under ADCC, EBI and a bunch of other modern format rules, all submissions are legal at all levels. As such, make a note of always checking the status of the bicep slicer before you enter a competition in which you intend to use it.
The Bicep Slicer Essentials
The bicep slicer, as a submission, is extremely versatile, you can catch it from pretty much anywhere, and you can use either your arm or your legs to get the tap. In certain cases, you can actually use both your arms and your legs for an ultra-tight slicer.
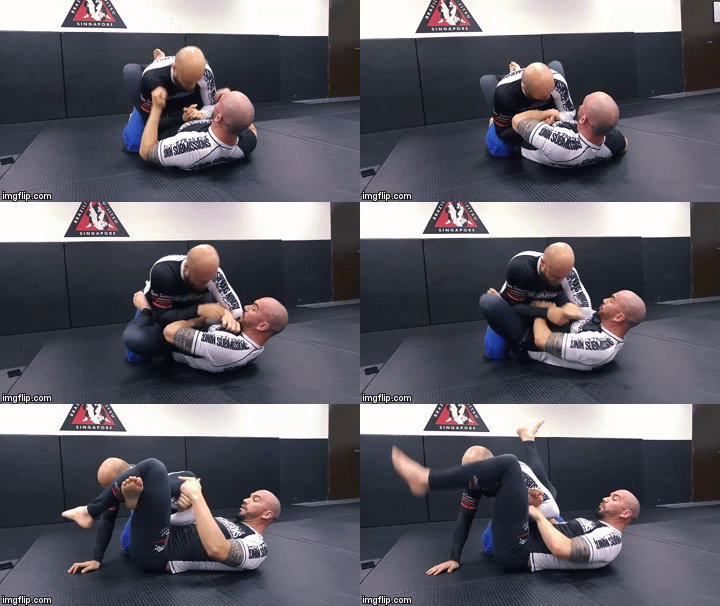
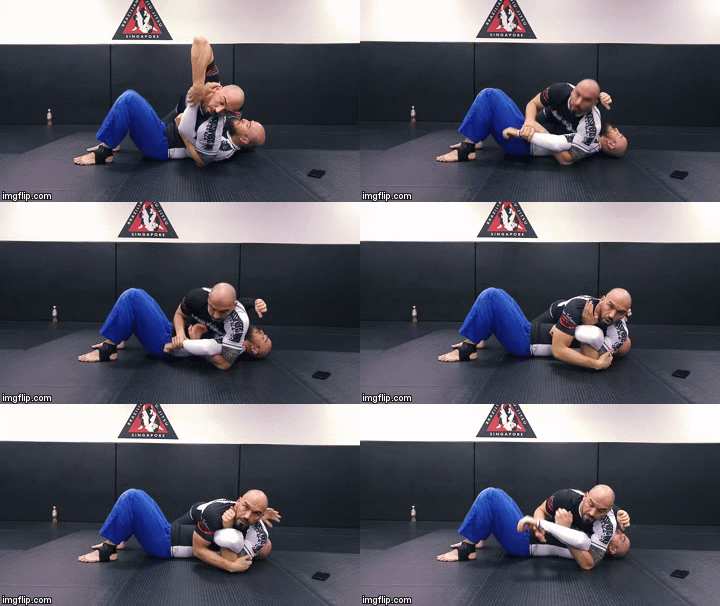
The bicep slicer works in a really simple manner. You take a bony part of your limbs, usually the shinbone or the forearm bone and you wedge it as deep as you can in the elbow crease of your opponent. As far as setting it up, if you achieve this you’re halfway there. What’s left is the compression part. To finish a bicep slicer, you need to find a way to push the opponent’s forearm towards their bicep. As you have your shin or forearm in the elbow crease, this puts the bottom bicep tendon under extreme pressure. Your goal is to basically try and touch the opponent’s hand to their own shoulder. To do that, you have several different leg and/or arm configurations available.

Guard Setups
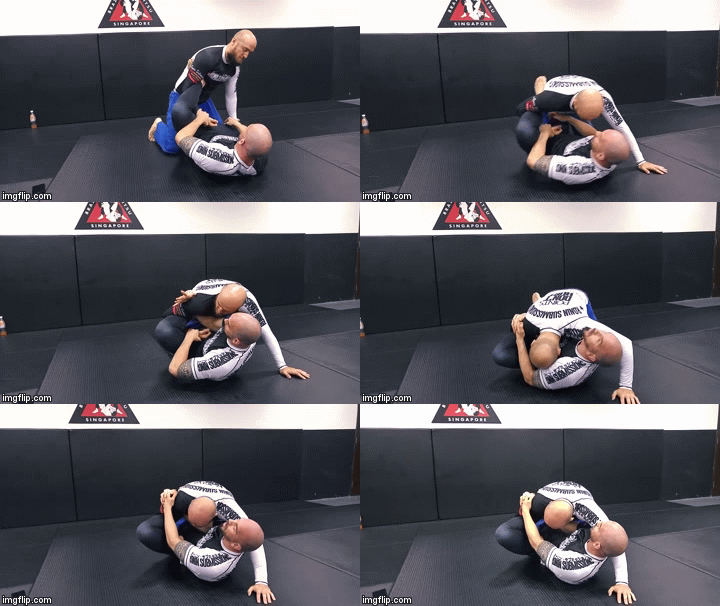

Side Control Entries
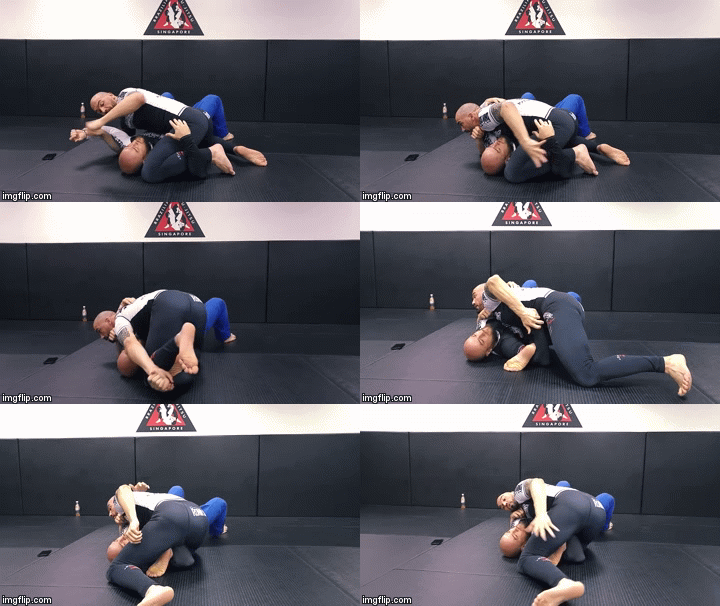
What to Do With This Information?
The bicep slicer is very powerful and not at all limited to the positions we covered earlier. Feel free to experiment with different setups and finishes. Just remember to have a bony part of your limbs inside the crease and turn that limb towards the crease when you finish. Nobody will be able to withstand it if you get all the mechanics correctly.
On the subject of efficient training, make sure you start with slicers at the blue, or purple belt at the latest. Do not wait to get your brown belt and then begin learning them because you’ll be behind. Instead, find willing training partners, consult your instructor and drill the move. If it is alright in your academy, go for it while you roll as well. Happy hunting!
Double Leg Takedown – How to Do It & The Most Common Mistakes


![Darce Choke Encyclopedia – Origins, Mechanics and Variations [2025] BJJ, choke, Brabo, BJJ Darce Choke, D'arce Choke, Darce BJJ Choke](https://bjj-world.com/wp-content/uploads/2017/11/JungPoirierLeeYahoo-218x150.jpg)




![No-Gi Grapplers Guide To Front Headlock Joel Bane DVD Review [2025] No-Gi Grapplers Guide To Front Headlock Joel Bane DVD Review](https://bjj-world.com/wp-content/uploads/2025/03/no-gi-front-headlock-joel-bane-dvd-review-218x150.png)

![Get Off My Legs Gringo Craig Jones DVD Review [2025] Get Off My Legs Gringo Craig Jones DVD Review](https://bjj-world.com/wp-content/uploads/2025/03/get-off-my-legs-gringo-craig-jones-dvd-review-218x150.png)

![Leg Lock Entries Helena Crevar DVD Review [2025] Leg Lock Entries Helena Crevar DVD Review](https://bjj-world.com/wp-content/uploads/2025/03/leg-lock-entries-helena-crevar-dvd-review-218x150.png)
![Special K Guard Neil Melanson DVD Review [2025] Special K Guard Neil Melanson DVD Review](https://bjj-world.com/wp-content/uploads/2025/03/special-k-guard-neil-melanson-dvd-review-218x150.png)
![Systematically Attacking The Crucifix Gordon Ryan DVD Review [2024] Systematically Attacking The Crucifix Gordon Ryan DVD Review](https://bjj-world.com/wp-content/uploads/2024/10/systematically-attacking-the-crucifix-gordon-ryan-dvd-review-324x235.png)
![How to Double Leg Anyone Kevin Lee DVD Review [2024] How to Double Leg Anyone Kevin Lee DVD Review](https://bjj-world.com/wp-content/uploads/2024/11/how-to-double-leg-anyone-kevin-lee-dvd-review-100x70.png)

![360 Degrees Guard Retention Thiago Abud DVD Review [2024] 360 Degrees Guard Retention Thiago Abud DVD Review](https://bjj-world.com/wp-content/uploads/2024/10/360-degrees-guard-retention-thiago-abud-dvd-review-100x70.png)


![Tiny Woman Guide To The Guard Ann Kneib DVD Review [2024] Tiny Woman Guide To The Guard Ann Kneib DVD Review](https://bjj-world.com/wp-content/uploads/2024/11/tiny-woman-guide-to-the-guard-ann-kneib-dvd-review-100x70.png)

![Shotgun Aoki Locks Mateusz Szczecinski DVD Review [2025] Shotgun Aoki Locks Mateusz Szczecinski DVD Review](https://bjj-world.com/wp-content/uploads/2025/03/shotgun-aoki-locks-mateusz-szczecinski-dvd-review-100x70.png)


![Jeff Glover DVD Bundle Review: Chokin’ Around With Uncle Jeff [2024] Jeff Glover DVD Bundle Review: Chokin' Around With Uncle Jeff](https://bjj-world.com/wp-content/uploads/2024/10/jeff-glover-dvd-bundle-review-chokin-around-100x70.png)

![Just Pass Jay Rodriguez DVD Review [2024] Just Pass Jay Rodriguez DVD Review](https://bjj-world.com/wp-content/uploads/2024/11/just-pass-jay-rodriguez-dvd-review-100x70.png)


![Underhooks With Uncle Jeff Glover DVD Review [2025] Underhooks With Uncle Jeff Glover DVD Review](https://bjj-world.com/wp-content/uploads/2025/02/underhooks-with-uncle-jeff-glover-dvd-review-100x70.png)
![Standing Leg Entries Alex West DVD Review [2025] Standing Leg Entries Alex West DVD Review](https://bjj-world.com/wp-content/uploads/2025/03/standing-leg-entries-alex-west-dvd-review-100x70.png)
![Jeff Higgs Self Defense Guard BJJ DVD Review [2024] Jeff Higgs Self Defense Guard BJJ DVD Review](https://bjj-world.com/wp-content/uploads/2024/09/jeff-higgs-self-defense-guard-bjj-dvd-review-100x70.png)
![Charles Allan Price Building Workouts For BJJ DVD Review [2024] Charles Allan Price Building Workouts For BJJ DVD Review](https://bjj-world.com/wp-content/uploads/2024/09/charles-allan-price-building-workouts-for-bjj-review-100x70.png)

![Darces From Everywhere Kade and Tye Ruotolo DVD Review [2024] Darces From Everywhere Kade and Tye Ruotolo DVD Review](https://bjj-world.com/wp-content/uploads/2024/10/darces-from-everywhere-kade-and-tye-ruotolo-dvd-cover-100x70.png)

![Dynamic De La Riva Guard Otavio Sousa DVD Review [2025] Dynamic De La Riva Guard Otavio Sousa DVD Review](https://bjj-world.com/wp-content/uploads/2025/02/dynamic-de-la-riva-guard-otavio-sousa-dvd-review-100x70.png)
![No-Gi Grapplers Guide To Front Headlock Joel Bane DVD Review [2025] No-Gi Grapplers Guide To Front Headlock Joel Bane DVD Review](https://bjj-world.com/wp-content/uploads/2025/03/no-gi-front-headlock-joel-bane-dvd-review-100x70.png)
![Simplify the System Side Scissor Brian Glick DVD Review [2024] Simplify the System Side Scissor Brian Glick DVD Review](https://bjj-world.com/wp-content/uploads/2024/09/side-scissor-brian-glick-dvd-review-2024-100x70.png)
![The Buchecha Gi Takedown System DVD Review [2025] The Buchecha Gi Takedown System DVD Review](https://bjj-world.com/wp-content/uploads/2025/01/buchecha-gi-takedown-system-dvd-review-100x70.png)
![Collar Sleeve Guard Mikey Musumeci DVD Review [2024] Collar Sleeve Guard Mikey Musumeci DVD Review](https://bjj-world.com/wp-content/uploads/2024/12/collar-sleeve-guard-mikey-musumeci-dvd-review-100x70.png)
