The defining symbol of Brazilian Jiu–Jitsu is often the triangle. For the Gracie Barra logo glorifying it, to lots and lots of logos of different academies, the triangle is the go-to BJJ symbol. There’s a good reason for it too- there are plenty of triangle choke variations that we use in Jiu–Jitsu. You can perform triangle chokes with the arms, legs, and perhaps even a combination of both. Out of the mall, the BJJ arm triangle remains my favorite option. It has been a while though since someone has introduced some variation in this department. Luckily, the wait is now over.
Neil Melanson is the person to follow if you like to submit people in cruel and unusual ways. the catch-wrestler / Sambo / Judo expert turned BJJ black belt has a very unusual and very submission-heavy game. He is also one of the top coaches out there and is not afraid to challenge all the BJJ dogmas and absolutes. Given that he has decades of grappling experience, everything he says has a lot of merit to it. A great example is his “upgrade” of the BJJ Arm Triangle choke that we’re so used to doing.
The BJJ Arm Triangle Choke
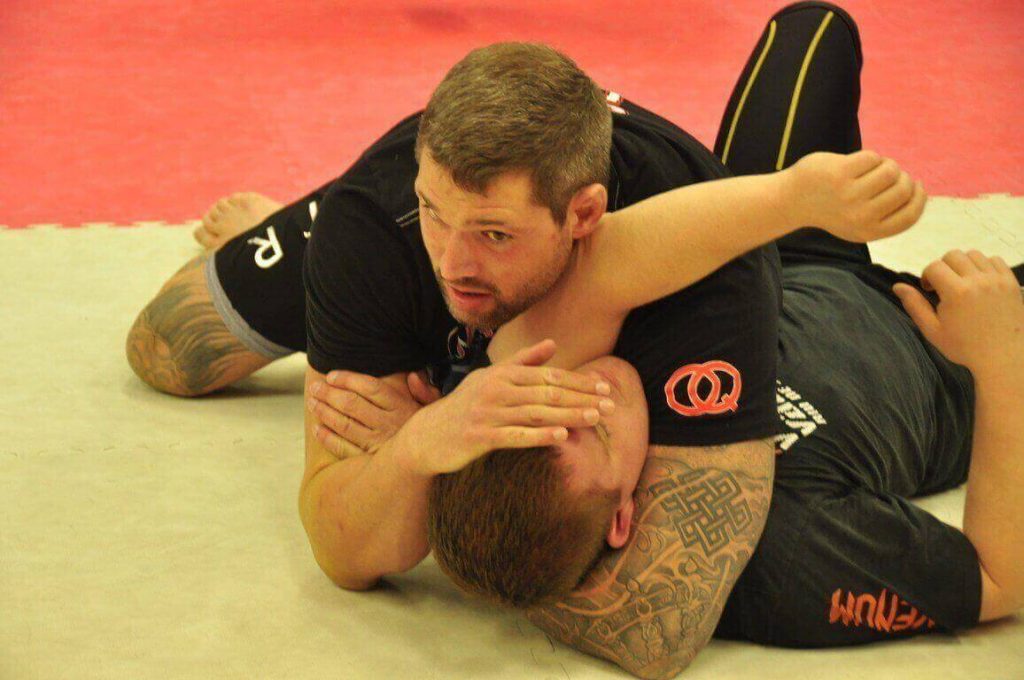
The BJJ Arm Triangle works like any other triangle choke. It utilizes the opponent’s own shoulder on one side, and the biceps for your arm on the other side of the neck. The moment most people miss is actually forcing the shoulder into the carotid artery on the near side. here’s the key hack for this – forget about pushing with your neck, or squeezing. Instead, look up slightly, aiming to push the shoulder into the neck with your collar bones. This makes the choke infinitely tighter and much harder to get out of. In fact, it renders the “answering the telephone” defense completely useless.
Furthermore, there are ways you can make yourself really heavy from the finishing position while preventing an opponent from any chance of escaping. All you need to do is lie at a slight angle to your opponent (focusing on pushing with the collarbone will determine the best one for you). Once you have it, make sure your legs are bent at the knees. Your feet should be dangling in the air, in fact. This makes you project weight into the shoulder to finish the move while making it notoriously difficult for anyone to try and force you into half-guard.
Finally, always try to finish the BJJ Arm Triangle Choke with one hand. Only when things get messy, should you introduce the other hand into the mix.
The Neil Melanson BJJ Arm Triangle Upgrade
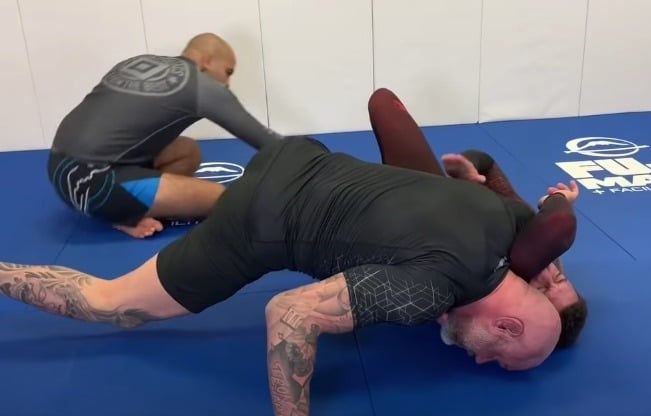
So, what is it the Neil does differently that makes his triangle even tighter? Well, for one, he figured out a way to hide the head. The collar bone in the shoulder thing works extremely well, but has a flaw- people might try and manipulate your head. Neil figured out a way to use the head to push on the shoulder from a different angle, making the BJJ Arm Triangle choke even tighter.
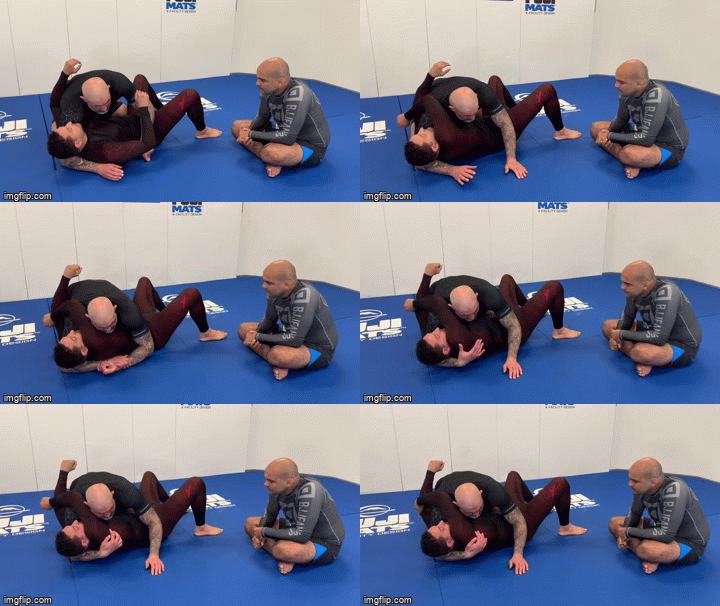
The arm position is actually a prerequisite for the head placement that makes the choke much tighter. Melanson figured out that you should place pressure on the rear delt muscle 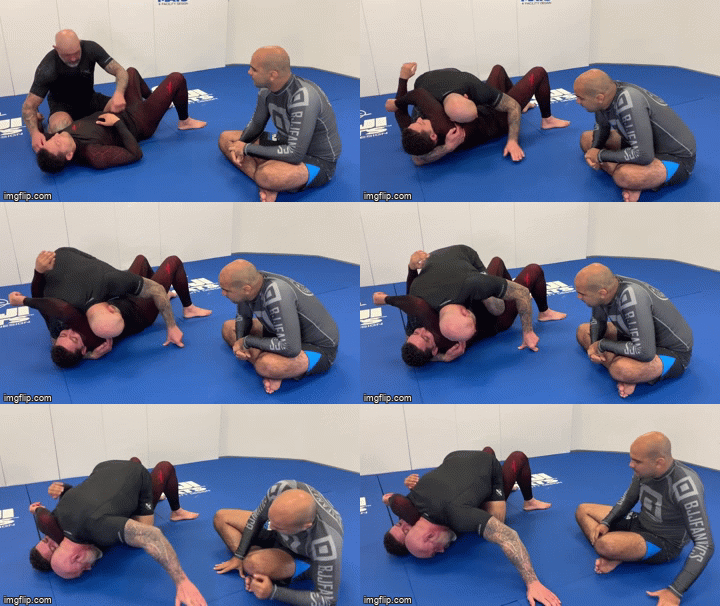
Finally, in order to finish, the configuration of the body is somewhat different from just lying beside your opponent. In a more dynamic type of control, Neil advocates a wide base, with the knee on the near side leg propped up against their hip. this really kills any motion an opponent might have left. Finally, for the finish, Neil posts the free arm wide, to help him push the shoulder even more. A simple flex of the biceps of the choking arm will put everyone you have in this BJJ arm triangle variation to sleep.
Getting To The Arm Triangle
Getting to the Arm Triangle position can often be the trickiest part of the puzzle. There are several positions that you can use to enter with a high percentage of success, and you should stick to them. However, whenever you see an opening make sure you go for it as long as you can achieve one main thing – create pressure early. That means that once you get the arm in place you should already be exerting pressure on the opponent, even though the BJJ Arm Triangle is far from ready.
Side control is the position that you should use to set up most of your BJJ Arm Triangle chokes. It makes a lot of sense tactically as you’re already in position, and all you need is to thread the arm in. If you go for the Arm Triangle from mount or half guard, you can also be successful. However, to finish, you’ll need to get to the side. That means abandoning mount (which is usually not a great idea) or passing half guard (which is usually not easy).
Finally, consider the BJJ Arm Triangle a backup option for situations when you end up losing back control. Instead of just looking for a mount, guiding someone in the Arm Triangle is a much better option, mostly because you already have it set up on the underhook side.
In Summary
The BJJ Arm Triangle choke was due to some innovation. It is not that the previous version did not work. In fact, versions work, from the early muscle-based finishes to the collar bone push, and now the latest Neil Melanson variation. The trick is figuring out the one that works for you. Of course, this upgraded version is a really tight one that offers a lot of places for experimenting and customization to fit your own needs.

![Darce Choke Encyclopedia – Origins, Mechanics and Variations [2025] BJJ, choke, Brabo, BJJ Darce Choke, D'arce Choke, Darce BJJ Choke](https://bjj-world.com/wp-content/uploads/2017/11/JungPoirierLeeYahoo-218x150.jpg)




![4 Weeks To A Better Guard Travis Stevens DVD Review [2025] 4 Weeks To A Better Guard Travis Stevens DVD Review](https://bjj-world.com/wp-content/uploads/2025/04/4-weeks-to-a-better-guard-travis-stevens-dvd-review-218x150.png)
![DONE! Gordon Ryan Retiring—and Danaher Might Not Be Far Behind! [2025] Gordon Ryan Retiring—and Danaher Might Not Be Far Behind!](https://bjj-world.com/wp-content/uploads/2025/04/LEG-GRABS-3-1-218x150.png)

![6 Most Essential Skills Base Top Dima Murovanni DVD Review [2025] 6 Most Essential Skills Base Top Dima Murovanni DVD Review](https://bjj-world.com/wp-content/uploads/2025/04/essential-skills-base-top-dima-murovanni-dvd-review-218x150.png)

![Cross Ashi Garami Firas Zahabi DVD Review [2025] Cross Ashi Garami Firas Zahabi DVD Review](https://bjj-world.com/wp-content/uploads/2025/04/cross-ashi-garami-firas-zahabi-dvd-review-218x150.png)


![Nicholas Meregali No-Gi System DVD Unpacked: A Detailed Review [2024] Nicholas Meregali No-Gi System DVD Unpacked: A Detailed Review](https://bjj-world.com/wp-content/uploads/2024/09/nicholas-meregali-no-gi-system-dvd-unpacked-review-100x70.png)

![The Closed Guard Malachy Friedman BJJ DVD Review [2025] The Closed Guard Malachy Friedman BJJ DVD Review](https://bjj-world.com/wp-content/uploads/2025/01/closed-guard-malachy-friedman-bjj-dvd-review-100x70.png)


![Knee Lever John Wayne Sweep Adam Wardzinski DVD Review [2024] Knee Lever John Wayne Sweep Adam Wardzinski DVD Review](https://bjj-world.com/wp-content/uploads/2024/12/john-wayne-sweep-adam-wardzinski-dvd-review-100x70.png)
![Don’t Stand Up Chris Wojcik DVD Review [2024] Don't Stand Up Chris Wojcik DVD Review](https://bjj-world.com/wp-content/uploads/2024/11/dont-stand-up-chris-wojcik-dvd-review-100x70.png)


![Roger Gracie Closed Guard System DVD Review [2025] Roger Gracie Closed Guard System DVD Review](https://bjj-world.com/wp-content/uploads/2025/01/roger-gracie-closed-guard-system-dvd-review-100x70.png)
![Underhooks With Uncle Jeff Glover DVD Review [2025] Underhooks With Uncle Jeff Glover DVD Review](https://bjj-world.com/wp-content/uploads/2025/02/underhooks-with-uncle-jeff-glover-dvd-review-100x70.png)
![Efficiently Executing X-Guard Giancarlo Bodoni DVD Review [2024] Efficiently Executing X-Guard Giancarlo Bodoni DVD Review](https://bjj-world.com/wp-content/uploads/2024/09/efficiently-executing-x-guard-giancarlo-bodoni-dvd-REVIEW-100x70.png)
![No-Gi Pressure Mastery JT Torres DVD Review [2024] No-Gi Pressure Mastery JT Torres DVD Review](https://bjj-world.com/wp-content/uploads/2024/10/no-gi-pressure-mastery-jt-torres-dvd-review-100x70.png)

