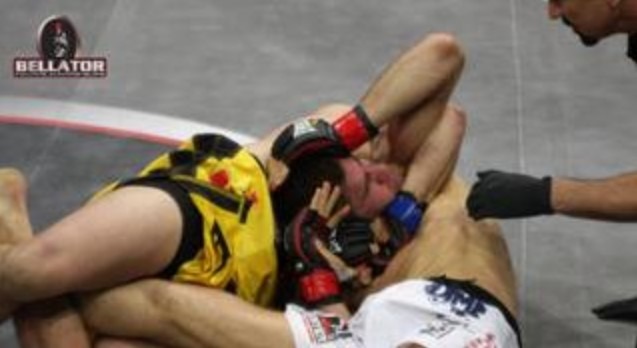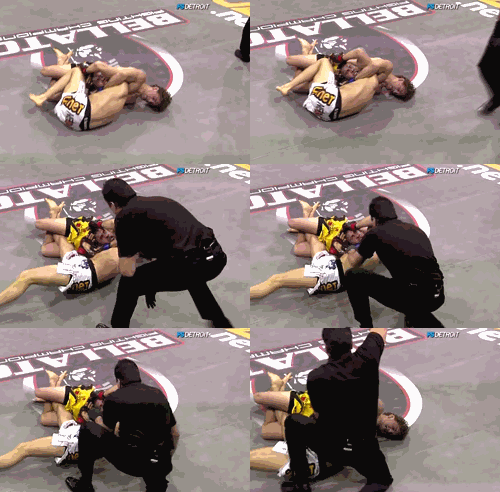
As far as unique choke setups go, the Japanese necktie is one of the top contenders. It is a very cool choking option, one that is very specific to do. The positioning of the Japanese necktie is such that those on the receiving end usually have no idea they’re even at risk. It is a very good option to catch even more experienced opponents off guard. Furthermore, it is a submission that is extremely tight and just as uncomfortable. Despite all that, the Japanese necktie is, for some inexplicable reason, a very underutilized submission. This is good news for you, though as you have the chance to learn a devastating submission that is going to bring you numerous victories.
One very important thing to know about the Japanese Necktie is that it is often not a very clear choke. Of course, when everything is in order, there’s no disputing the choke. However, it doesn’t take much to end up with a neck crank instead. In fact, your first few attempts area all but guaranteed to end up as a crank. Relax, though, as it is an IBJJF legal position as cranking from there is unintentional. In comparison, it is like finishing with a bad rear naked choke that is more of a crank from the back. That said, if you are going for cranks in addition to your chokes than the Japanese necktie is the perfect double attack. You get both a choke and a neck crank from the same exact position. All it takes is just minor adjustments to the grip and body position.
How To Do The Japanese Necktie
The execution of the Japanese necktie includes a few very important steps. First of all, is initial body positioning. You have to put your body in the correct alignment to even think about performing a Japanese Necktie. This opens up the opportunity to set up the correct grip. Although the grip might seem odd and even uncomfortable at the beginning, you’ll get used to it. Furthermore, you’ll need to significantly change the position of your body, in order to be able to have enough leverage for the finish. This is arguable, the most important part of the technique. Finally, it is all about how you squeeze and key finishing details that’ll bring you a fast and very panicky tap.
-
Initial Body Positioning
In order to set up the choke, you need to be in a position to prepare the correct grip. The Japanese necktie is most effective from the top since you need to thread an arm through for a modified head and arm control. If you know how to perform a D’arce choke, you won’t have any trouble doing so. This means that from top half guard, for example, you’ll need to thread the same side arm under the opponent’s top arm and around their head. This is very contrary to the usual step of just using your far side arm to control the head. However, it is absolutely crucial to setting up a necktie. To get your arm in this position, you’ll need to open your torso away from your opponent. In order to avoid giving up the back, a top hint is to have a Whizzer on.
-
Grip Structure
Once the arm is true you can think about setting up the grip. The basic idea is to connect the bottom arm to the top one via a modified Vice grip. A regular Vice grip is also going to do the trick, but a small modification makes it much more effective. Once the bottom arm is deep behind the neck, connect a Vice grip with your top arm. Look to place the forearm on the top arm as near the base of the skull of the opponent as possible. The goal here is to connect your elbows. However, the Vice grip is less than ideal to allow this to happen.
The modification you need to do is place the thumb of your bottom arm (the one trapping the arm and the neck) between the index and middle fingers of your top arm. This allows your elbows to not only connect but also past each other in a scissor-like fashion.
-
Shifting Your Bodyweight
To finish the necktie you’ll need to trap the head of your opponent with your body before finishing the choke. The most important thing in finishing the necktie is trapping a leg. If you’re still in half guard, just trap the bottom leg since you’re already in position. If however, you have passed the half guard while setting up the necktie (which is often going to happen) you’ll need to work a bit more. In that case, simply go for the opponent’s top leg and trap it in between yours. Once you have a leg, look to lie to your far side, but mind the direction. You want to end up with your belly covering the back of the opponent’s head. This means you’ll have to squeeze your elbows tightly together and look to place your cheek between the opponent’s shoulder blades while looking up.
-
Finishing The Japanese Necktie
Once you’re in position, finishing the Japanese necktie takes very little effort. Namely, all you need to do is use the triangle you have on one of the opponent’s leg to pull it towards their head. As you do that, pull both your arms towards your torso, squeezing tightly at the same time. In most cases, this is where you’ll get the tap. If not, continue to rotate the head of the opponent towards the ceiling. This is going to finish the move for sure. Speaking of rotating, doing this without applying a tight squeeze, or in a less than optimal body position is how you get a straight neck crank.
Positional Necktie Attacks
As you can see from the example above, the top half guard is one of the best positions to attack with a Japanese Necktie. As a natural continuation of the half guard, if/when you pass you can still look to set up the choke. When you’re in the side control all you need to do to make your opponent turn towards you. If you still have a Whizzer or overlook on their far side arm, perfect. If not, you’ll sneak it in as the turn, allowing you to look for the modified Vice grip. From there, trap the to leg and just finish the necktie as before.
One other very potent way to set the Japanese necktie up is from the turtle. First of all, focus on attacking the turtle from a classic front headlock. From this position, initial body positioning should be from the front headlock, but you’ll have to switch to one side for the head and arm control. The arm that traps both the head and the arms dictates which side to go to. The modified Vice grip is extremely powerful for controlling this position. For a full necktie, first trap the near side leg, by inserting your foot behind the opponent’s knee. Next, use the grip to force their forehead towards their own belly, This is going to result in them falling over, and the hook you put in earlier is going to allow you to trap the leg. Now, you’re in a familiar position for an easy finish.
How To Chain Together Front Headlock Attacks
One more Japanese necktie aspect to consider is the positional location of the submission. If you think about it, the Japanese Necktie is the perfect pit stop for front headlock attacks. It is exactly halfway between a Guillotine and a D’arce choke. These two chokes often make up successful attacking combinations. Transitioning between them, though, often leaves a gap. The Japanese necktie is the perfect plug for this gap.
Whether you’re going from a guillotine to a D’arce or back, having the option to finish halfway is something most people miss. With the necktie, you have a double gain. First, you shorten the transition by adding another stop, which translates to better overall control. Secondly, you add a submission option. For example, it is very easy to turn a failed D’arce into a necktie, and then go into a guillotine or an Anaconda choke. The same holds true in reverse, though you’ll need a bit more positional adjustments to get a Japanese necktie off a Guillotine. Whatever the case is, though, it is the perfect go-between to surprise even the highest level, opponents. Give it a try!
You Might Also Like:
Deconstructing the Mechanics of the D’arce Choke
Guillotine Choke – Basics, Secrets, and Variations to make it perfect
The Hidden Secrets of the Reverse Triangle Choke
Peruvian Necktie – A Tight Choke and Brutal Neck Crank
The Highest Percentage No Gi Chokes
Top And Bottom Baseball Choke Setups For Jiu-Jitsu
The Arm Triangle Choke Encyclopedia For Grapplers


![Darce Choke Encyclopedia – Origins, Mechanics and Variations [2024] BJJ, choke, Brabo, BJJ Darce Choke, D'arce Choke, Darce BJJ Choke](https://bjj-world.com/wp-content/uploads/2017/11/JungPoirierLeeYahoo-218x150.jpg)


![Shotgun Aoki Locks Mateusz Szczecinski DVD Review [2025] Shotgun Aoki Locks Mateusz Szczecinski DVD Review](https://bjj-world.com/wp-content/uploads/2025/03/shotgun-aoki-locks-mateusz-szczecinski-dvd-review-218x150.png)


![Upper Body Chain Attacks Janine Mocaiber DVD Review [2025] Upper Body Chain Attacks Janine Mocaiber DVD Review](https://bjj-world.com/wp-content/uploads/2025/03/upper-body-chain-attacks-janine-mocaiber-dvd-review-218x150.png)
![The Empty Half Guard Michael Currier DVD Review [2025] The Empty Half Guard Michael Currier DVD Review](https://bjj-world.com/wp-content/uploads/2025/03/empty-half-guard-michael-currier-dvd-review-218x150.png)

![Osoto Gari for Jiu Jitsu Jackson Nagai DVD Review [2024] Osoto Gari for Jiu Jitsu Jackson Nagai DVD Review](https://bjj-world.com/wp-content/uploads/2024/10/osoto-gari-for-jiu-jitsu-jackson-nagai-dvd-review-324x235.png)


![Ginastica Natural Alvaro Romano DVD Review [2024] Ginastica Natural Alvaro Romano DVD Review](https://bjj-world.com/wp-content/uploads/2024/12/ginastica-natural-alvaro-romano-dvd-review-100x70.png)
![Welcome To The Darce Side Travis Moore DVD Review [2025] Welcome To The Darce Side Travis Moore DVD Review](https://bjj-world.com/wp-content/uploads/2025/01/welcome-to-the-darce-side-travis-moore-dvd-review-100x70.png)
![Compass Kneebar System Charles Harriott DVD Review [2024] Compass Kneebar System Charles Harriott DVD Review](https://bjj-world.com/wp-content/uploads/2024/11/compass-kneebar-system-charles-harriott-dvd-review-100x70.png)


![Dynamic Headquarters Passing Jason Rau DVD Review [2024] Dynamic Headquarters Passing Jason Rau DVD Review](https://bjj-world.com/wp-content/uploads/2024/10/dynamic-headquarters-passing-jason-rau-dvd-review-100x70.png)
![The Empty Half Guard Michael Currier DVD Review [2025] The Empty Half Guard Michael Currier DVD Review](https://bjj-world.com/wp-content/uploads/2025/03/empty-half-guard-michael-currier-dvd-review-100x70.png)

![Best Marcelo Garcia Techniques by Team Marcelo Garcia DVD Review [2025] Best Marcelo Garcia Techniques by Team Marcelo Garcia DVD Review](https://bjj-world.com/wp-content/uploads/2025/02/best-marcelo-garcia-techniques-dvd-review-100x70.png)
![Miko Hytonen Lapel Chokes From Everywhere DVD Review [2024] Miko Hytonen Lapel Chokes From Everywhere DVD Review](https://bjj-world.com/wp-content/uploads/2024/10/miko-hytonen-lapel-chokes-from-everywhere-dvd-review-100x70.png)


![Gracie Secrets Closed Guard Kyra Gracie DVD Review [2024] Gracie Secrets Closed Guard Kyra Gracie DVD Review](https://bjj-world.com/wp-content/uploads/2024/12/closed-guard-kyra-gracie-dvd-review-100x70.png)
![Double Sleeve Guard Jon Thomas BJJ DVD Review [2024] Double Sleeve Guard Jon Thomas BJJ DVD Review](https://bjj-world.com/wp-content/uploads/2024/10/double-sleeve-guard-jon-thomas-bjj-dvd-review-100x70.png)
![Just Pass Jay Rodriguez DVD Review [2024] Just Pass Jay Rodriguez DVD Review](https://bjj-world.com/wp-content/uploads/2024/11/just-pass-jay-rodriguez-dvd-review-100x70.png)
![Baseball Chokes From Everywhere Magid Hage DVD Review [2025] Baseball Chokes From Everywhere Magid Hage DVD Review](https://bjj-world.com/wp-content/uploads/2025/01/baseball-chokes-from-everywhere-magid-hage-dvd-review-100x70.png)
![No-Gi Defense Xande Ribeiro DVD Review [2024] No-Gi Defense Xande Ribeiro DVD Review](https://bjj-world.com/wp-content/uploads/2024/11/no-gi-defense-xande-ribeiro-dvd-review-100x70.png)


![Roger Gracie Guard Passing System DVD Review [2025] Roger Gracie Guard Passing System DVD Review](https://bjj-world.com/wp-content/uploads/2025/02/roger-gracie-guard-passing-system-dvd-review-100x70.png)